Android software: Difference between revisions
(Created page with "[{{fullurl:Wheelphone}} Wheelphone main wiki]<br/> =Apps shortcut list= * [http://www.gctronic.com/doc/index.php/Android_software#Basic_demos Basic demos, simple behaviour]:...") |
No edit summary |
||
| (One intermediate revision by the same user not shown) | |||
| Line 2: | Line 2: | ||
=Apps shortcut list= | =Apps shortcut list= | ||
* [ | * [https://www.gctronic.com/doc/index.php/Android_software#Basic_demos Basic demos, simple behaviour]: | ||
** [ | ** [https://www.gctronic.com/doc/index.php/Android_software#Monitor_advanced Monitor application advanced]: Visualize all the sensor information on the phone and implement "move-around-on-table" behavior. [https://projects.gctronic.com/wheelphone/Wheelphone.apk Wheelphone.apk], [https://play.google.com/store/apps/details?id=com.wheelphone.wheelphone&feature=search_result#?t=W251bGwsMSwyLDEsImNvbS53aGVlbHBob25lLndoZWVscGhvbmUiXQ.. <img width=20 src="https://www.gctronic.com/doc/images/google-play.png">Wheelphone].<br/> | ||
** [ | ** [https://www.gctronic.com/doc/index.php/Android_software#Wheelphone_odometry Wheelpone odometry]: odometry debug [https://projects.gctronic.com/wheelphone/WheelphoneOdomMotion-rev163.apk WheelphoneOdometry.apk] | ||
** [ | ** [https://www.gctronic.com/doc/index.php/Android_software#Wheelphone_tag_detection Wheelpone tag detection]: marker detection debug [https://projects.gctronic.com/wheelphone/WheelphoneTargetDebug-rev181.apk WheelphoneTagDetection.apk] | ||
** [ | ** [https://www.gctronic.com/doc/index.php/Android_software#Wheelphone_Follow Wheelphone follow]: Follow the leader application. It allows the robot to follow an object in front of it, using the front facing proximity sensors. [https://projects.gctronic.com/wheelphone/Wheelphone_follow-rev156.apk Wheelphone_follow.apk] | ||
** [ | ** [https://www.gctronic.com/doc/index.php/Android_software#Wheelphone_Recorder Wheelphone recorder]: record video while moving. [https://projects.gctronic.com/wheelphone/Wheelphone_recorder-rev159.apk WheelphoneRecorder.apk] | ||
** [ | ** [https://www.gctronic.com/doc/index.php/Android_software#Wheelphone_Faceme Wheelphone faceme]: Face-tracking application. It keeps track of the position of one face using the front facing camera, then controls the robot to try to face always the tracked face. [https://projects.gctronic.com/wheelphone/Wheelphone_faceme-rev155.apk WheelphoneFaceme.apk] | ||
** [ | ** [https://www.gctronic.com/doc/index.php/Android_software#Blob_following Wheelphone blob follow]: the Wheelphone robot follows a blob chosen by the user through the interface. [https://projects.gctronic.com/wheelphone/WheelphoneBlobDetection-rev160.apk WheelphoneBlobDetection.apk] | ||
** [ | ** [https://www.gctronic.com/doc/index.php/Android_software#Line_following Wheelphone line follow]: it allows the robot to follow a black (or white) line on the floor using the ground sensors. [https://projects.gctronic.com/wheelphone/WheelphoneLineFollowing-rev162.apk WheelphoneLineFollowing.apk] | ||
* [ | * [https://www.gctronic.com/doc/index.php/Android_software#Interactive_demos Interactive apps]: | ||
** [ | ** [https://www.gctronic.com/doc/index.php/Android_software#Wheelphone_Pet Wheelphone Pet]: PET application. It makes the robot behave like a pet. A behavior module allows it to show expressions and behave accordingly. Additionally has a face-tracking and text-to-speech modules to be able to interact with the environment. [https://projects.gctronic.com/wheelphone/WheelphonePet.apk WheelphonePet.apk] [https://play.google.com/store/apps/details?id=com.wheelphone.pet <img width=20 src="https://www.gctronic.com/doc/images/google-play.png">WheelphonePet] | ||
** [ | ** [https://www.gctronic.com/doc/index.php/Android_software#Wheelphone_Alarm Wheelphone Alarm]: Application that interfaces with the Wheelphone to provide a playful experience when the alarm rings. [https://projects.gctronic.com/wheelphone/WheelphoneAlarm.apk WheelphoneAlarm.apk], [https://play.google.com/store/apps/details?id=com.wheelphone.alarm <img width=20 src="https://www.gctronic.com/doc/images/google-play.png">WheelphoneAlarm] | ||
* [ | * [https://www.gctronic.com/doc/index.php/Android_software#Navigation Navigation apps]: | ||
** [ | ** [https://www.gctronic.com/doc/index.php/Android_software#Wheelphone_markers_navigation Wheelphone markers navigation]: markers based navigation. [https://projects.gctronic.com/wheelphone/WheelphoneTargetNavigation.apk WheelphoneTargetNavigation.apk] [https://play.google.com/store/apps/details?id=com.wheelphone.targetNavigation <img width=20 src="https://www.gctronic.com/doc/images/google-play.png">WheelphoneTargetNavigation] | ||
** [ | ** [https://www.gctronic.com/doc/index.php/Android_software#Wheelphone_Navigator Wheelphone Navigator]: environment navigation application. It allows the robot to navigate an environment looking for targets while avoiding obstacles. It has two modules to avoid the obstacles: (1)the robot’s front proximity sensors and (2)the camera + Optical Flow. [https://projects.gctronic.com/wheelphone/WheelphoneNavigator.apk WheelphoneNavigator.apk] [https://play.google.com/store/apps/details?id=com.wheelphone <img width=20 src="https://www.gctronic.com/doc/images/google-play.png">WheelphoneNavigator] | ||
* [ | * [https://www.gctronic.com/doc/index.php/Android_software#ROS ROS demo]: the robot publishes sensors and image data and the computer subscribes to them | ||
** phone-side: [ | ** phone-side: [https://projects.gctronic.com/wheelphone/WheelphoneROS.apk WheelphoneROS.apk], [https://play.google.com/store/apps/details?id=com.wheelphone.ros&feature=search_result#?t=W251bGwsMSwxLDEsImNvbS53aGVlbHBob25lLnJvcyJd <img width=20 src="https://www.gctronic.com/doc/images/google-play.png">Wheelphone ROS]. | ||
** pc-side: [ | ** pc-side: [https://projects.gctronic.com/wheelphone/pc-side-node-rev161-08.10.13.zip ros pc-side binary files].<br/> | ||
* [ | * [https://www.gctronic.com/doc/index.php/Android_software#Autonomous_docking Autonomous docking]: | ||
** [ | ** [https://projects.gctronic.com/wheelphone/WheelphoneBlobDocking.apk WheelphoneBlobDocking.apk], [https://play.google.com/store/apps/details?id=com.gctronic.android.blobDocking&feature=search_result#?t=W251bGwsMSwxLDEsImNvbS5nY3Ryb25pYy5hbmRyb2lkLmJsb2JEb2NraW5nIl0. <img width=20 src="https://www.gctronic.com/doc/images/google-play.png">Wheelphone blob docking] <br/> | ||
** [ | ** [https://projects.gctronic.com/wheelphone/WheelphoneTargetDocking.apk WheelphoneTargetDocking.apk], [https://play.google.com/store/apps/details?id=com.wheelphone.targetDocking&hl=en <img width=20 src="https://www.gctronic.com/doc/images/google-play.png">Wheelphone target docking] <br/> | ||
* [ | * [https://www.gctronic.com/doc/index.php/Android_software#Remote_control Remote control]: | ||
** [ | ** [https://www.gctronic.com/doc/index.php/Android_software#Telepresence_with_Skype telepresence with Skype]. | ||
** [ | ** [https://www.gctronic.com/doc/index.php/Android_software#Wheelphone_remote remote control (audio, video, movement)]:[https://projects.gctronic.com/wheelphone/WheelphoneRemote.apk WheelphoneRemote.apk], [https://play.google.com/store/apps/details?id=com.wheelphone.remote&feature=search_result#?t=W251bGwsMSwxLDEsImNvbS53aGVlbHBob25lLnJlbW90ZSJd <img width=20 src="https://www.gctronic.com/doc/images/google-play.png">Wheelphone remote]. <br/> | ||
** [ | ** [https://www.gctronic.com/doc/index.php/Android_software#Wheelphone_remote_mini remote control (only movement)]: [https://projects.gctronic.com/wheelphone/WheelphoneRemoteMini.apk WheelphoneRemoteMini.apk], [https://play.google.com/store/apps/details?id=com.wheelphone.remotemini&feature=search_result#?t=W251bGwsMSwxLDEsImNvbS53aGVlbHBob25lLnJlbW90ZW1pbmkiXQ.. <img width=20 src="https://www.gctronic.com/doc/images/google-play.png">Wheelphone remote mini]. <br/> | ||
=Supported phones= | =Supported phones= | ||
Some phones are reported to not work due to missed system libraries; you can test if your phone should be supported with the following application: [ | Some phones are reported to not work due to missed system libraries; you can test if your phone should be supported with the following application: [https://projects.gctronic.com/wheelphone/features.apk features.apk]. From the list of features that is shown the ''android.hardware.usb.accessory'' must be present. If you are intereseted you can find the source code from the following link [https://projects.gctronic.com/wheelphone/features.zip features.zip]<br/> | ||
Moreover the phone must be configured in order to accept installation of applications coming from different sources than Play Store.<br/> | Moreover the phone must be configured in order to accept installation of applications coming from different sources than Play Store.<br/> | ||
| Line 53: | Line 53: | ||
Let us know if your phone is working at the following address:<br/> | Let us know if your phone is working at the following address:<br/> | ||
[ | [https://www.gctronic.com/doc/images/mail.gif <img width=200 src="https://www.gctronic.com/doc/images/mail.gif">] | ||
=Wheelphone library= | =Wheelphone library= | ||
| Line 59: | Line 59: | ||
The source code is available from the following repository: | The source code is available from the following repository: | ||
<pre>svn checkout https://github.com/gctronic/wheelphone-library/trunk/android-wheelphone-library android-wheelphone-library-read-only</pre> | <pre>svn checkout https://github.com/gctronic/wheelphone-library/trunk/android-wheelphone-library android-wheelphone-library-read-only</pre> | ||
Alternatively you can download directly the jar file to be included in your project [ | Alternatively you can download directly the jar file to be included in your project [https://projects.gctronic.com/wheelphone/WheelphoneLibrary-rev15.jar WheelphoneLibrary.jar].<br/> | ||
You can find the API documentation in the ''doc'' folder or you can download it from [ | You can find the API documentation in the ''doc'' folder or you can download it from [https://projects.gctronic.com/wheelphone/WheelphoneLibrary-rev87-31.05.13.pdf WheelphoneLibrary.pdf].<br/> | ||
=ROS= | =ROS= | ||
| Line 66: | Line 66: | ||
===ROS Fuerte=== | ===ROS Fuerte=== | ||
<font style="font-size:125%">'''APK'''</font><br/> | <font style="font-size:125%">'''APK'''</font><br/> | ||
The android application can be downloaded from the Google Play store [https://play.google.com/store/apps/details?id=com.wheelphone.ros&feature=search_result#?t=W251bGwsMSwxLDEsImNvbS53aGVlbHBob25lLnJvcyJd <img width=20 src=" | The android application can be downloaded from the Google Play store [https://play.google.com/store/apps/details?id=com.wheelphone.ros&feature=search_result#?t=W251bGwsMSwxLDEsImNvbS53aGVlbHBob25lLnJvcyJd <img width=20 src="https://www.gctronic.com/doc/images/google-play.png">Wheelphone ROS], or directly from [https://projects.gctronic.com/wheelphone/WheelphoneROS.apk WheelphoneROS.apk].<br/> | ||
<font style="font-size:125%">'''Source'''</font><br/> | <font style="font-size:125%">'''Source'''</font><br/> | ||
| Line 74: | Line 74: | ||
<font style="font-size:125%">'''Requirements building'''</font><br/> | <font style="font-size:125%">'''Requirements building'''</font><br/> | ||
* [ | * [https://docs.rosjava.googlecode.com/hg/android_core/html/index.html android_core] | ||
<font style="font-size:125%">'''How To'''</font><br/> | <font style="font-size:125%">'''How To'''</font><br/> | ||
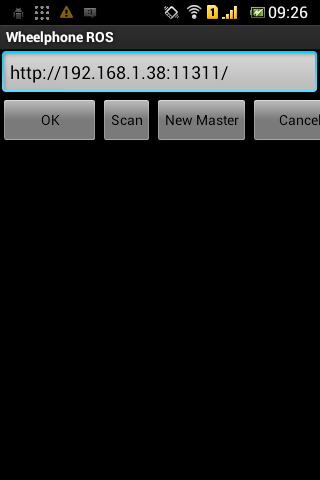
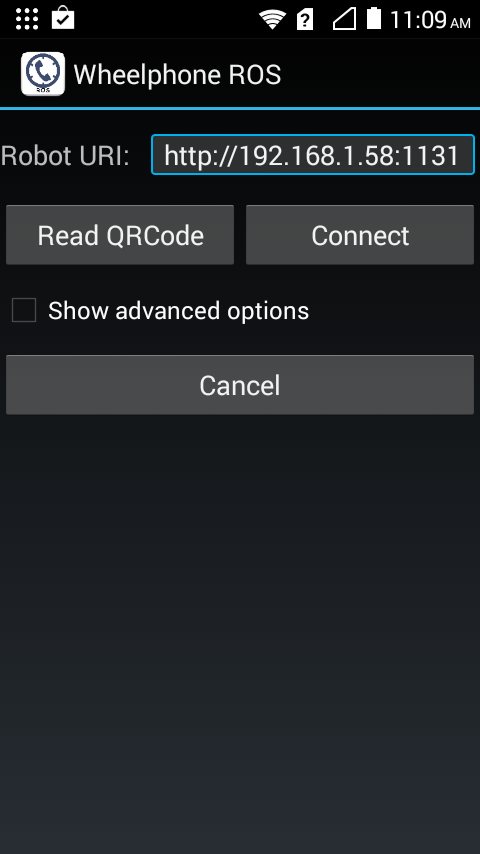
1) once the application is started the IP address of the computer running ''roscore'' need to be inserted, then press ''OK''<br/> | 1) once the application is started the IP address of the computer running ''roscore'' need to be inserted, then press ''OK''<br/> | ||
<span class="plainlinks">[ | <span class="plainlinks">[https://www.gctronic.com/doc/images/Screenshot-WP-ROS1.png <img width=100 src="https://www.gctronic.com/doc/images/Screenshot-WP-ROS1.png">]</span><br/> | ||
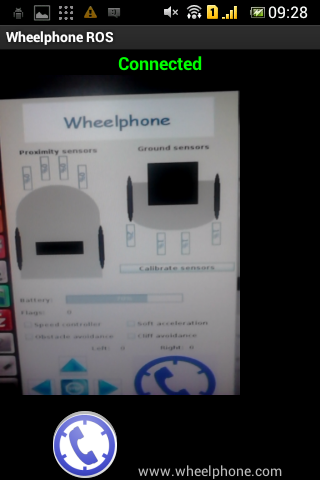
2) on top of the window you should see "Connected" and right after the camera image that is sent to the computer; after some seconds you should receive the sensors values and the camera image in the computer. If you see "Robot disconnected" you need to restart the application<br/> | 2) on top of the window you should see "Connected" and right after the camera image that is sent to the computer; after some seconds you should receive the sensors values and the camera image in the computer. If you see "Robot disconnected" you need to restart the application<br/> | ||
<span class="plainlinks">[ | <span class="plainlinks">[https://www.gctronic.com/doc/images/Screenshot-WP-ROS2.png <img width=100 src="https://www.gctronic.com/doc/images/Screenshot-WP-ROS2.png">]</span><br/> | ||
===ROS Hydro=== | ===ROS Hydro=== | ||
<font style="font-size:125%">'''APK'''</font><br/> | <font style="font-size:125%">'''APK'''</font><br/> | ||
The android application can be downloaded from directly from [ | The android application can be downloaded from directly from [https://projects.gctronic.com/wheelphone/WheelphoneROShydro.apk WheelphoneROShydro.apk].<br/> | ||
<font style="font-size:125%">'''Source'''</font><br/> | <font style="font-size:125%">'''Source'''</font><br/> | ||
| Line 91: | Line 91: | ||
<font style="font-size:125%">'''How to build'''</font><br/> | <font style="font-size:125%">'''How to build'''</font><br/> | ||
# download and install Andorid Studio + SDK, refer to [ | # download and install Andorid Studio + SDK, refer to [https://wiki.ros.org/android/Android%20Studio/Download https://wiki.ros.org/android/Android%20Studio/Download] | ||
# sudo apt-get install ros-hydro-catkin ros-hydro-ros ros-hydro-rosjava python-wstool | # sudo apt-get install ros-hydro-catkin ros-hydro-ros ros-hydro-rosjava python-wstool | ||
# download android core frome the repo [https://github.com/rosjava/android_core/tree/hydro https://github.com/rosjava/android_core/tree/hydro] and extract it to your preferred dir (e.g. ~/hydro_workspace/android) | # download android core frome the repo [https://github.com/rosjava/android_core/tree/hydro https://github.com/rosjava/android_core/tree/hydro] and extract it to your preferred dir (e.g. ~/hydro_workspace/android) | ||
| Line 99: | Line 99: | ||
# close and reopen Android Studio; the wheelphone project should be available for building | # close and reopen Android Studio; the wheelphone project should be available for building | ||
Alternatively you can download directly a virtual machine which includes all the system requirements you need to start playing with ROS and Wheelphone from the following link [ | Alternatively you can download directly a virtual machine which includes all the system requirements you need to start playing with ROS and Wheelphone from the following link [https://projects.gctronic.com/wheelphone/ROSHydro-WP.ova ROSHydro-WP.ova] (based on the VM from [https://nootrix.com/2014/04/virtualized-ros-hydro/ https://nootrix.com/2014/04/virtualized-ros-hydro/]); this is the easiest way! | ||
<font style="font-size:125%">'''How to run'''</font><br/> | <font style="font-size:125%">'''How to run'''</font><br/> | ||
1) once the application is started the IP address of the computer running ''roscore'' need to be inserted, then press ''Connect''<br/> | 1) once the application is started the IP address of the computer running ''roscore'' need to be inserted, then press ''Connect''<br/> | ||
<span class="plainlinks">[ | <span class="plainlinks">[https://www.gctronic.com/doc/images/Screenshot-WP-ROShydro.png <img width=100 src="https://www.gctronic.com/doc/images/Screenshot-WP-ROShydro.png">]</span><br/> | ||
2) on top of the window you should see "Connected" and right after the camera image that is sent to the computer; after some seconds you should receive the sensors values and the camera image in the computer. If you see "Robot disconnected" you need to restart the application<br/> | 2) on top of the window you should see "Connected" and right after the camera image that is sent to the computer; after some seconds you should receive the sensors values and the camera image in the computer. If you see "Robot disconnected" you need to restart the application<br/> | ||
<span class="plainlinks">[ | <span class="plainlinks">[https://www.gctronic.com/doc/images/Screenshot-WP-ROS2.png <img width=100 src="https://www.gctronic.com/doc/images/Screenshot-WP-ROS2.png">]</span><br/> | ||
<font style="font-size:125%">'''Useful links'''</font><br/> | <font style="font-size:125%">'''Useful links'''</font><br/> | ||
* [ | * [https://wiki.ros.org/android/Tutorials/hydro ROS Hydro Android] | ||
* [ | * [https://wiki.ros.org/android/Tutorials/hydro/Installation%20-%20Ros%20Development%20Environment ROS Hydro Android Development Environment] | ||
* [ | * [https://wiki.ros.org/android/Android%20Studio https://wiki.ros.org/android/Android%20Studio] | ||
* [ | * [https://developer.android.com/sdk/installing/studio-build.html https://developer.android.com/sdk/installing/studio-build.html] | ||
* [https://code.google.com/p/rosjava-tf/ https://code.google.com/p/rosjava-tf/] | * [https://code.google.com/p/rosjava-tf/ https://code.google.com/p/rosjava-tf/] | ||
* [https://github.com/rosjava/rosjava_mvn_repo https://github.com/rosjava/rosjava_mvn_repo] | * [https://github.com/rosjava/rosjava_mvn_repo https://github.com/rosjava/rosjava_mvn_repo] | ||
| Line 119: | Line 119: | ||
<font style="font-size:125%">'''Summary'''</font><br/> | <font style="font-size:125%">'''Summary'''</font><br/> | ||
This is a monitor interface of the Wheelphone based on ROS:<br/> | This is a monitor interface of the Wheelphone based on ROS:<br/> | ||
[ | [https://www.gctronic.com/doc/images/ros-gui.png <img width=200 src="https://www.gctronic.com/doc/images/ros-gui-small.png">] <br/> | ||
You can move the robot through the interface or through the keyboard: arrow keys to move and enter to stop.<br/> | You can move the robot through the interface or through the keyboard: arrow keys to move and enter to stop.<br/> | ||
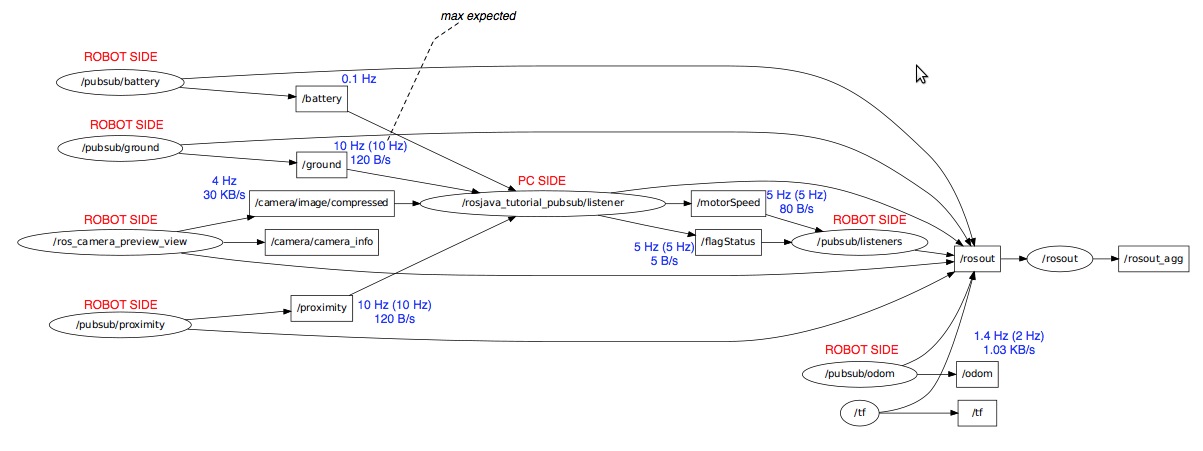
Here is the nodes involved in ROS: <br> | Here is the nodes involved in ROS: <br> | ||
[ | [https://www.gctronic.com/doc/images/ros-rxgraph.jpg <img height=200 src="https://www.gctronic.com/doc/images/ros-rxgraph-small.jpg">] <br/> | ||
A video of the this demo can be seen here [ | A video of the this demo can be seen here [https://www.gctronic.com/doc/index.php/Wheelphone-videos#Remote_control_with_ROS video]. | ||
===ROS Fuerte=== | ===ROS Fuerte=== | ||
<font style="font-size:125%">'''Requirements running'''</font><br/> | <font style="font-size:125%">'''Requirements running'''</font><br/> | ||
* [ | * [https://www.ros.org ROS Fuerte] (previous version not tested) | ||
* [ | * [https://code.google.com/p/rosjava/ rosjava], refers also to the [https://docs.rosjava.googlecode.com/hg/rosjava_core/html/index.html rosjava_core documentation] | ||
<font style="font-size:125%">'''Source'''</font><br/> | <font style="font-size:125%">'''Source'''</font><br/> | ||
The source code is available from [ | The source code is available from [https://projects.gctronic.com/wheelphone/rosjava_tutorial_pubsub-rev160-08.10.13.zip rosjava_tutorial_pubsub.zip]. It's based on the ''rosjava_tutorial_pubsub'' contained in the ''rosjava package''. | ||
<font style="font-size:125%">'''How To'''</font><br/> | <font style="font-size:125%">'''How To'''</font><br/> | ||
Follow these steps to start the PC-side node: | Follow these steps to start the PC-side node: | ||
# download the [ | # download the [https://projects.gctronic.com/wheelphone/pc-side-node-rev161-08.10.13.zip ros pc-side binary files] | ||
# modify the script ''start-ros.sh'' in the ''bin'' directory with the correct IP address of the host computer | # modify the script ''start-ros.sh'' in the ''bin'' directory with the correct IP address of the host computer | ||
# execute ''start-ros.sh'' (if the script isn't executable type ''chmod +x -R path-to/bin'' where bin is the bin directory of the zip) | # execute ''start-ros.sh'' (if the script isn't executable type ''chmod +x -R path-to/bin'' where bin is the bin directory of the zip) | ||
| Line 141: | Line 141: | ||
===ROS Hydro=== | ===ROS Hydro=== | ||
<font style="font-size:125%">'''Requirements'''</font><br/> | <font style="font-size:125%">'''Requirements'''</font><br/> | ||
* [ | * [https://wiki.ros.org/hydro ROS Hydro]; you can download a virtual machine with ROS Hydro already installed (Ubuntu) from here [https://nootrix.com/2014/04/virtualized-ros-hydro/ https://nootrix.com/2014/04/virtualized-ros-hydro/] | ||
* [ | * [https://wiki.ros.org/rosjava rosjava]; type the following commands in a terminal to install rosjava: | ||
** sudo apt-get update | ** sudo apt-get update | ||
** sudo apt-get install openjdk-6-jre | ** sudo apt-get install openjdk-6-jre | ||
** sudo apt-get install ros-hydro-rosjava | ** sudo apt-get install ros-hydro-rosjava | ||
Alternatively you can download directly a virtual machine which includes all the system requirements you need to start playing with ROS and Wheelphone from the following link [ | Alternatively you can download directly a virtual machine which includes all the system requirements you need to start playing with ROS and Wheelphone from the following link [https://projects.gctronic.com/wheelphone/ROSHydro-WP.ova ROSHydro-WP.ova] (based on the VM from [https://nootrix.com/2014/04/virtualized-ros-hydro/ https://nootrix.com/2014/04/virtualized-ros-hydro/]); this is the easiest way! | ||
<font style="font-size:125%">'''How To Build'''</font><br/> | <font style="font-size:125%">'''How To Build'''</font><br/> | ||
| Line 161: | Line 161: | ||
# cd ../.. | # cd ../.. | ||
# catkin_make | # catkin_make | ||
# download the [ | # download the [https://projects.gctronic.com/wheelphone/my_pub_sub_tutorial.zip pc-side project] and substitute the "my_pub_sub_tutorial" directory with the content of the zip | ||
# cd ~/hydro_workspace/rosjava | # cd ~/hydro_workspace/rosjava | ||
# catkin_make | # catkin_make | ||
| Line 167: | Line 167: | ||
<font style="font-size:125%">'''How To Run'''</font><br/> | <font style="font-size:125%">'''How To Run'''</font><br/> | ||
# open a terminal and type: | # open a terminal and type: | ||
## export ROS_MASTER_URI= | ## export ROS_MASTER_URI=https://IP:11311 (IP should be the host machine IP, e.g. 192.168.1.10) | ||
## export ROS_IP=IP (the same IP as before) | ## export ROS_IP=IP (the same IP as before) | ||
# open a second terminal and type the previous two commands | # open a second terminal and type the previous two commands | ||
| Line 177: | Line 177: | ||
<font style="font-size:125%">'''Useful links'''</font><br/> | <font style="font-size:125%">'''Useful links'''</font><br/> | ||
* [ | * [https://wiki.ros.org/rosjava rosjava] | ||
* [ | * [https://wiki.ros.org/rosjava/Tutorials/hydro/Installation rosjava installation] | ||
* [ | * [https://wiki.ros.org/rosjava_build_tools/Tutorials/hydro/Creating%20Rosjava%20Packages Creating rosjava packages] | ||
* [ | * [https://wiki.ros.org/rosjava_build_tools/Tutorials/hydro/WritingPublisherSubscriber%28Java%29 Writing a simple publisher and subscriber] | ||
* [https://github.com/rosjava rosjava github] | * [https://github.com/rosjava rosjava github] | ||
===ROS Tools=== | ===ROS Tools=== | ||
* you can use [ | * you can use [https://wiki.ros.org/rviz rviz] to visualize odometry information, type "rosrun rviz rviz" and open one of the following configuration files depending on your ROS version [https://projects.gctronic.com/wheelphone/rviz-fuerte.zip fuerte config] [https://projects.gctronic.com/wheelphone/rviz-hydro.zip hydro config]. | ||
* you can use [ | * you can use [https://wiki.ros.org/rxgraph rxgraph (fuerte)] or [https://wiki.ros.org/rqt_graph rqt_graph (hydro)] to visualize a diagram of the nodes and topics available in ROS simply type "rxgraph" or "rqt_graph" in a terminal | ||
=Navigation= | =Navigation= | ||
| Line 200: | Line 200: | ||
Frame target detection is performed using the Vuforia Augmented Reality SDK (license agreements: [https://developer.vuforia.com/legal/license https://developer.vuforia.com/legal/license]).<br/> | Frame target detection is performed using the Vuforia Augmented Reality SDK (license agreements: [https://developer.vuforia.com/legal/license https://developer.vuforia.com/legal/license]).<br/> | ||
A nice video of the demo can be seen here [ | A nice video of the demo can be seen here [https://www.gctronic.com/doc/index.php/Wheelphone-videos#Wheelphone_navigation_and_automatic_docking_with_markers video]. | ||
The following image shows the history of a complete tour taken from the HTTP page published by the Wheelphone:<br/> | The following image shows the history of a complete tour taken from the HTTP page published by the Wheelphone:<br/> | ||
[ | [https://www.gctronic.com/doc/images/AppartTagSequenceHistory.png <img width=200 src="https://www.gctronic.com/doc/images/AppartTagSequenceHistory-small.png">] <br/> | ||
The markers used in the demo can be donwloaded from here: [ | The markers used in the demo can be donwloaded from here: [https://projects.gctronic.com/wheelphone/frameMarkerChargerStation.pdf charger station], [https://projects.gctronic.com/wheelphone/frameMarkerLivingRoom.pdf living room], [https://projects.gctronic.com/wheelphone/frameMarkerKitchen.pdf kitchen].<br/> | ||
A similar application was developed also for iPhone, have a look [ | A similar application was developed also for iPhone, have a look [https://www.gctronic.com/doc/index.php/IPhone_software#iWheel_semester_project here] for more information. | ||
<font style="font-size:125%">'''APK'''</font><br/> | <font style="font-size:125%">'''APK'''</font><br/> | ||
The android application can be downloaded from the Google Play store [https://play.google.com/store/apps/details?id=com.wheelphone.targetNavigation&hl=it <img width=20 src=" | The android application can be downloaded from the Google Play store [https://play.google.com/store/apps/details?id=com.wheelphone.targetNavigation&hl=it <img width=20 src="https://www.gctronic.com/doc/images/google-play.png">Wheelphone markers navigation], or directly from [https://projects.gctronic.com/wheelphone/WheelphoneTargetNavigation.apk WheelphoneTargetNavigation.apk].<br/> | ||
<font style="font-size:125%">'''Source'''</font><br/> | <font style="font-size:125%">'''Source'''</font><br/> | ||
| Line 217: | Line 217: | ||
<font style="font-size:125%">'''How To'''</font><br/> | <font style="font-size:125%">'''How To'''</font><br/> | ||
1) prepare the docking station with the marker [ | 1) prepare the docking station with the marker [https://projects.gctronic.com/wheelphone/frameMarkerChargerStation.pdf charger station], the "navigation targets" with markers [https://projects.gctronic.com/wheelphone/frameMarkerLivingRoom.pdf living room] and [https://projects.gctronic.com/wheelphone/frameMarkerKitchen.pdf kitchen] and place them in a triangular shape in such a way that form the docking station the robot is able to detect the "living room", from the "living room" the robot is able to detect the "kitchen" and from the kitchen the robot is able to detect the docking station, like shown in the following figures:<br/> | ||
<span class="plainlinks">[ | <span class="plainlinks">[https://www.gctronic.com/doc/images/MarkerOnDocking.jpg <img width=100 src="https://www.gctronic.com/doc/images/MarkerOnDocking-small.jpg">]</span> | ||
<span class="plainlinks">[ | <span class="plainlinks">[https://www.gctronic.com/doc/images/MarkerOnSupport.jpg <img width=140 src="https://www.gctronic.com/doc/images/MarkerOnSupport-small.jpg">]</span> | ||
<span class="plainlinks">[ | <span class="plainlinks">[https://www.gctronic.com/doc/images/TargetNavigationEnv.jpg <img width=200 src="https://www.gctronic.com/doc/images/TargetNavigationEnv-small.jpg">]</span><br/> | ||
2) once the application is started you should see "Connected" on top of the window, otherwise you need to restart the application (back button, turn off the robot, turn on the robot, select the app from the list)<br/> | 2) once the application is started you should see "Connected" on top of the window, otherwise you need to restart the application (back button, turn off the robot, turn on the robot, select the app from the list)<br/> | ||
3) the robot start searching (pivot rotation) the marker id 2 (living room); when the robot finds the marker it goes towards it until it is near, then it rotates for about 180 degrees saying what target it found and then takes a picture that will be automatically updated on the web page. In case the marker isn't found then after 30 seconds the robot start searching the next target <br/> | 3) the robot start searching (pivot rotation) the marker id 2 (living room); when the robot finds the marker it goes towards it until it is near, then it rotates for about 180 degrees saying what target it found and then takes a picture that will be automatically updated on the web page. In case the marker isn't found then after 30 seconds the robot start searching the next target <br/> | ||
| Line 226: | Line 226: | ||
The following figure explains the values and parameters available in the application:<br/> | The following figure explains the values and parameters available in the application:<br/> | ||
<span class="plainlinks">[ | <span class="plainlinks">[https://www.gctronic.com/doc/images/WPTargetNavigation-howto.png <img width=500 src="https://www.gctronic.com/doc/images/WPTargetNavigation-howto-small.png">]</span><br/> | ||
==Wheelphone Navigator== | ==Wheelphone Navigator== | ||
| Line 235: | Line 235: | ||
* Eclipse: 4.2 | * Eclipse: 4.2 | ||
* Android SDK API level: 18 (JELLY_BEAN_MR2) | * Android SDK API level: 18 (JELLY_BEAN_MR2) | ||
* Android NDK: r9 [ | * Android NDK: r9 [https://developer.android.com/tools/sdk/ndk/index.html Android NDK] | ||
* OpenCV: 2.4.6 [ | * OpenCV: 2.4.6 [https://opencv.org/android OpenCV Android SDK] | ||
<font style="font-size:125%">'''Requirements running'''</font><br/> | <font style="font-size:125%">'''Requirements running'''</font><br/> | ||
| Line 249: | Line 249: | ||
<font style="font-size:125%">'''APK'''</font><br/> | <font style="font-size:125%">'''APK'''</font><br/> | ||
[ | [https://projects.gctronic.com/wheelphone/WheelphoneNavigator.apk WheelphoneNavigator.apk] [https://play.google.com/store/apps/details?id=com.wheelphone <img width=20 src="https://www.gctronic.com/doc/images/google-play.png">WheelphoneNavigator] | ||
<font style="font-size:125%">'''Source'''</font><br/> | <font style="font-size:125%">'''Source'''</font><br/> | ||
| Line 260: | Line 260: | ||
==Wheelphone blob docking== | ==Wheelphone blob docking== | ||
<font style="font-size:125%">'''Summary'''</font><br/> | <font style="font-size:125%">'''Summary'''</font><br/> | ||
This demo uses OpenCV to detect a colored blob placed on the charging station; the blob is used to give the robot a direction to follow to reach the docking station. When the robot is near the docking it detect a black line (placed on the ground) and follow it to correctly orient itself towards the charging contacts. The project contains also a stripped version of [ | This demo uses OpenCV to detect a colored blob placed on the charging station; the blob is used to give the robot a direction to follow to reach the docking station. When the robot is near the docking it detect a black line (placed on the ground) and follow it to correctly orient itself towards the charging contacts. The project contains also a stripped version of [https://code.google.com/p/spydroid-ipcamera/ Spydroid] (only HTTP server) that let the user start and stop the demo remotely from a PC or another phone.<br/> | ||
<font style="font-size:125%">'''Requirements building'''</font><br/> | <font style="font-size:125%">'''Requirements building'''</font><br/> | ||
Developer requirements (for building the project): | Developer requirements (for building the project): | ||
* [ | * [https://opencv.org/android OpenCV Android SDK] | ||
<font style="font-size:125%">'''Requirements running'''</font><br/> | <font style="font-size:125%">'''Requirements running'''</font><br/> | ||
| Line 271: | Line 271: | ||
<font style="font-size:125%">'''APK'''</font><br/> | <font style="font-size:125%">'''APK'''</font><br/> | ||
The android application can be downloaded from the Google Play store [https://play.google.com/store/apps/details?id=com.gctronic.android.blobDocking&feature=search_result#?t=W251bGwsMSwxLDEsImNvbS5nY3Ryb25pYy5hbmRyb2lkLmJsb2JEb2NraW5nIl0. <img width=20 src=" | The android application can be downloaded from the Google Play store [https://play.google.com/store/apps/details?id=com.gctronic.android.blobDocking&feature=search_result#?t=W251bGwsMSwxLDEsImNvbS5nY3Ryb25pYy5hbmRyb2lkLmJsb2JEb2NraW5nIl0. <img width=20 src="https://www.gctronic.com/doc/images/google-play.png">Wheelphone blob docking], or directly from [https://projects.gctronic.com/wheelphone/WheelphoneBlobDocking.apk WheelphoneBlobDocking.apk].<br/> | ||
<font style="font-size:125%">'''Source'''</font><br/> | <font style="font-size:125%">'''Source'''</font><br/> | ||
| Line 280: | Line 280: | ||
1) once the application is started the robot start moving around with obstacle avoidance enabled looking for a docking station<br/> | 1) once the application is started the robot start moving around with obstacle avoidance enabled looking for a docking station<br/> | ||
2) take the robot in your hands and press the "Blob tab" that show you the camera view. Point the robot to the docking station and touch on the screen to select the blob to follow as shown in the following figure:<br/> | 2) take the robot in your hands and press the "Blob tab" that show you the camera view. Point the robot to the docking station and touch on the screen to select the blob to follow as shown in the following figure:<br/> | ||
<span class="plainlinks">[ | <span class="plainlinks">[https://www.gctronic.com/doc/images/Screenshot-WPBlobDocking1.png <img width=100 src="https://www.gctronic.com/doc/images/Screenshot-WPBlobDocking1-small.png">]</span><br/> | ||
3) place the robot on the ground and press the "Calibrate sensors" button to calibrate the robot in your environment; be sure to remove any object near the robot<br/> | 3) place the robot on the ground and press the "Calibrate sensors" button to calibrate the robot in your environment; be sure to remove any object near the robot<br/> | ||
4) set a threshold corresponding to the value of the ground sensors related to the black line used to centering to the docking station; if the ground sensor value < threshold then the black line is detected<br/> | 4) set a threshold corresponding to the value of the ground sensors related to the black line used to centering to the docking station; if the ground sensor value < threshold then the black line is detected<br/> | ||
| Line 289: | Line 289: | ||
==Wheelphone target docking== | ==Wheelphone target docking== | ||
<font style="font-size:125%">'''Summary'''</font><br/> | <font style="font-size:125%">'''Summary'''</font><br/> | ||
This demo uses the Vuforia Augmented Reality SDK to detect a frame target placed on the charging station; the target is used to give the robot a direction to follow to reach the docking station. With this library you get also the orientation of the robot respect to the target, that is respect to the charger; with this information it's easier for the robot to be aligned to the charging station before reaching it. The project contains also a stripped version of [ | This demo uses the Vuforia Augmented Reality SDK to detect a frame target placed on the charging station; the target is used to give the robot a direction to follow to reach the docking station. With this library you get also the orientation of the robot respect to the target, that is respect to the charger; with this information it's easier for the robot to be aligned to the charging station before reaching it. The project contains also a stripped version of [https://code.google.com/p/spydroid-ipcamera/ Spydroid] (only HTTP server) that let the user start and stop the demo remotely from a PC or another phone.<br/> | ||
A video of the this demo can be seen here [ | A video of the this demo can be seen here [https://www.gctronic.com/doc/index.php/Wheelphone-videos#Wheelphone_automatic_docking_with_marker video]. | ||
<font style="font-size:125%">'''Requirments building'''</font><br/> | <font style="font-size:125%">'''Requirments building'''</font><br/> | ||
| Line 297: | Line 297: | ||
<font style="font-size:125%">'''APK'''</font><br/> | <font style="font-size:125%">'''APK'''</font><br/> | ||
The android application can be downloaded from the Google Play store [https://play.google.com/store/apps/details?id=com.wheelphone.targetDocking&hl=en <img width=20 src=" | The android application can be downloaded from the Google Play store [https://play.google.com/store/apps/details?id=com.wheelphone.targetDocking&hl=en <img width=20 src="https://www.gctronic.com/doc/images/google-play.png">Wheelphone target docking], or directly from [https://projects.gctronic.com/wheelphone/WheelphoneTargetDocking.apk WheelphoneTargetDocking.apk].<br/> | ||
<font style="font-size:125%">'''Source'''</font><br/> | <font style="font-size:125%">'''Source'''</font><br/> | ||
| Line 304: | Line 304: | ||
<font style="font-size:125%">'''How To'''</font><br/> | <font style="font-size:125%">'''How To'''</font><br/> | ||
1) prepare the docking station with the marker [ | 1) prepare the docking station with the marker [https://projects.gctronic.com/wheelphone/frameMarkerChargerStation.pdf charger station] as shown in the following figure:<br/> | ||
<span class="plainlinks">[ | <span class="plainlinks">[https://www.gctronic.com/doc/images/MarkerOnDocking.jpg <img width=100 src="https://www.gctronic.com/doc/images/MarkerOnDocking-small.jpg">]</span><br/> | ||
2) once the application is started you should see "Connected" on top of the window, otherwise you need to restart the application (back button, turn off the robot, turn on the robot, select the app from the list) <br/> | 2) once the application is started you should see "Connected" on top of the window, otherwise you need to restart the application (back button, turn off the robot, turn on the robot, select the app from the list) <br/> | ||
3) the robot starts searching for the charging station rotating on place at little steps<br/> | 3) the robot starts searching for the charging station rotating on place at little steps<br/> | ||
| Line 319: | Line 319: | ||
<font style="font-size:125%">'''Summary'''</font><br/> | <font style="font-size:125%">'''Summary'''</font><br/> | ||
Wheelphone allows worldwide telepresence simply using Skype. One can have a real time video feedback from a remote place where the robot is moving. To control the Wheelphone robot movement, just open the Skype numpad and pilot the robot while seeing the real time images. <br/> | Wheelphone allows worldwide telepresence simply using Skype. One can have a real time video feedback from a remote place where the robot is moving. To control the Wheelphone robot movement, just open the Skype numpad and pilot the robot while seeing the real time images. <br/> | ||
A video of the this demo can be seen here [ | A video of the this demo can be seen here [https://www.gctronic.com/doc/index.php/Wheelphone-videos#Wheelphone_robot_telepresence_with_Skype_.28iPhone_and_Android.29 video]. | ||
<font style="font-size:125%">'''How To'''</font><br/> | <font style="font-size:125%">'''How To'''</font><br/> | ||
| Line 328: | Line 328: | ||
# start the Skype application in the computer (or alternatively from another phone), login and make a video call to the account you use on the phone connected to the robot (if you are in the same room disable the microphone) | # start the Skype application in the computer (or alternatively from another phone), login and make a video call to the account you use on the phone connected to the robot (if you are in the same room disable the microphone) | ||
# now you should be able to get the robot view; open the Skype numpad on the computer side and use it to move the robot, the commands are shown in the following figure: | # now you should be able to get the robot view; open the Skype numpad on the computer side and use it to move the robot, the commands are shown in the following figure: | ||
[ | [https://www.gctronic.com/doc/images/skype-dialpad-cmd.jpg <img width=300 src="https://www.gctronic.com/doc/images/skype-dialpad-cmd.jpg">]<br/> | ||
==Wheelphone remote== | ==Wheelphone remote== | ||
<font style="font-size:125%">'''Summary'''</font><br/> | <font style="font-size:125%">'''Summary'''</font><br/> | ||
The robot can be easily controlled via a browser after having configured the computer and the robot to be in the same wifi network. The project is based on the ''spydroid (v6.0)'' application, refer to [ | The robot can be easily controlled via a browser after having configured the computer and the robot to be in the same wifi network. The project is based on the ''spydroid (v6.0)'' application, refer to [https://code.google.com/p/spydroid-ipcamera/ https://code.google.com/p/spydroid-ipcamera/] for more information. <br/> | ||
<font style="font-size:125%">'''APK'''</font><br/> | <font style="font-size:125%">'''APK'''</font><br/> | ||
The android application can be downloaded from the Google Play store [https://play.google.com/store/apps/details?id=com.wheelphone.remote&feature=search_result#?t=W251bGwsMSwxLDEsImNvbS53aGVlbHBob25lLnJlbW90ZSJd <img width=20 src=" | The android application can be downloaded from the Google Play store [https://play.google.com/store/apps/details?id=com.wheelphone.remote&feature=search_result#?t=W251bGwsMSwxLDEsImNvbS53aGVlbHBob25lLnJlbW90ZSJd <img width=20 src="https://www.gctronic.com/doc/images/google-play.png">Wheelphone remote], or directly from [https://projects.gctronic.com/wheelphone/WheelphoneRemote.apk WheelphoneRemote.apk].<br/> | ||
<font style="font-size:125%">'''Source'''</font><br/> | <font style="font-size:125%">'''Source'''</font><br/> | ||
| Line 342: | Line 342: | ||
<font style="font-size:125%">'''How To'''</font><br/> | <font style="font-size:125%">'''How To'''</font><br/> | ||
1) make sure to have the latest [ | 1) make sure to have the latest [https://addons.videolan.org/ VLC plugin] installed on the computer; unfortunately there is no VLC plugin for mobile phone so at the moment the video cannot be visualized if a connection ''phone to robot'' is performed (only movment commands are available). <br/> | ||
2) connect the phone and the computer within the same network <br/> | 2) connect the phone and the computer within the same network <br/> | ||
3) once the application is started you'll see the address to be inserted in the browser to be able to control the robot; open a browser and insert the address; if all is working well you'll see the following html page:<br/> | 3) once the application is started you'll see the address to be inserted in the browser to be able to control the robot; open a browser and insert the address; if all is working well you'll see the following html page:<br/> | ||
<span class="plainlinks">[ | <span class="plainlinks">[https://www.gctronic.com/doc/images/Screenshot-WPRemote.png <img width=200 src="https://www.gctronic.com/doc/images/Screenshot-WPRemote-small.png">]</span><br/> | ||
4) click on the "Connect" button in the html page and you should receive the video stream; on the right you've some commands to send to the robot, i.e. sounds, motions, ... | 4) click on the "Connect" button in the html page and you should receive the video stream; on the right you've some commands to send to the robot, i.e. sounds, motions, ... | ||
| Line 354: | Line 354: | ||
<font style="font-size:125%">'''APK'''</font><br/> | <font style="font-size:125%">'''APK'''</font><br/> | ||
The android application can be downloaded from the [https://play.google.com/store/apps/details?id=com.wheelphone.remotemini&feature=search_result#?t=W251bGwsMSwxLDEsImNvbS53aGVlbHBob25lLnJlbW90ZW1pbmkiXQ.. <img width=20 src=" | The android application can be downloaded from the [https://play.google.com/store/apps/details?id=com.wheelphone.remotemini&feature=search_result#?t=W251bGwsMSwxLDEsImNvbS53aGVlbHBob25lLnJlbW90ZW1pbmkiXQ.. <img width=20 src="https://www.gctronic.com/doc/images/google-play.png">Wheelphone remote mini], or directly from [https://projects.gctronic.com/wheelphone/WheelphoneRemoteMini.apk WheelphoneRemoteMini.apk].<br/> | ||
<font style="font-size:125%">'''Source'''</font><br/> | <font style="font-size:125%">'''Source'''</font><br/> | ||
| Line 364: | Line 364: | ||
1) connect the phone and the computer within the same network <br/> | 1) connect the phone and the computer within the same network <br/> | ||
2) once the application is started you'll see the address to be inserted in the browser to be able to control the robot; open a browser and insert the address; if all is working well you'll see the following html page:<br/> | 2) once the application is started you'll see the address to be inserted in the browser to be able to control the robot; open a browser and insert the address; if all is working well you'll see the following html page:<br/> | ||
<span class="plainlinks">[ | <span class="plainlinks">[https://www.gctronic.com/doc/images/Screenshot1-WPRemoteMini.jpg <img width=200 src="https://www.gctronic.com/doc/images/Screenshot1-WPRemoteMini-small.jpg">]</span><br/> | ||
3) press the "Start animation" button to start the visualization of various images that will change based on the commands sent to the robot through the html page; coupled with the images there will be also sounds related to motion commands<br/> | 3) press the "Start animation" button to start the visualization of various images that will change based on the commands sent to the robot through the html page; coupled with the images there will be also sounds related to motion commands<br/> | ||
| Line 370: | Line 370: | ||
Moreover you can place a marker (ID0 or ID1) on front of the robot and the robot will start to follow it (pivot rotation only), moreover information about the target will be shown on the screen, like in the following figure:<br/> | Moreover you can place a marker (ID0 or ID1) on front of the robot and the robot will start to follow it (pivot rotation only), moreover information about the target will be shown on the screen, like in the following figure:<br/> | ||
<span class="plainlinks">[ | <span class="plainlinks">[https://www.gctronic.com/doc/images/Screenshot2-WPRemoteMini.jpg <img width=100 src="https://www.gctronic.com/doc/images/Screenshot2-WPRemoteMini-small.jpg">]</span><br/> | ||
==Telepresence with Skype and Wheelphone remote mini== | ==Telepresence with Skype and Wheelphone remote mini== | ||
| Line 379: | Line 379: | ||
<font style="font-size:125%">'''Source'''</font><br/> | <font style="font-size:125%">'''Source'''</font><br/> | ||
The source code of the "UPnP-IGD" application is available from [ | The source code of the "UPnP-IGD" application is available from [https://projects.gctronic.com/wheelphone/UPnP-IGD.zip UPnP-IGD.zip]. This application setup a forwarding rule to the current device on port 8080. | ||
<font style="font-size:125%">'''How To'''</font><br/> | <font style="font-size:125%">'''How To'''</font><br/> | ||
| Line 398: | Line 398: | ||
* Eclipse: 4.2 | * Eclipse: 4.2 | ||
* Android SDK API level: 18 (JELLY_BEAN_MR2) | * Android SDK API level: 18 (JELLY_BEAN_MR2) | ||
* Android NDK: r9 [ | * Android NDK: r9 [https://developer.android.com/tools/sdk/ndk/index.html Android NDK] | ||
'''Building process:''' | '''Building process:''' | ||
| Line 410: | Line 410: | ||
<font style="font-size:125%">'''APK'''</font><br/> | <font style="font-size:125%">'''APK'''</font><br/> | ||
[ | [https://projects.gctronic.com/wheelphone/WheelphonePet.apk WheelphonePet.apk] [https://play.google.com/store/apps/details?id=com.wheelphone.pet <img width=20 src="https://www.gctronic.com/doc/images/google-play.png">WheelphonePet] | ||
<font style="font-size:125%">'''Source'''</font><br/> | <font style="font-size:125%">'''Source'''</font><br/> | ||
| Line 437: | Line 437: | ||
<font style="font-size:125%">'''APK'''</font><br/> | <font style="font-size:125%">'''APK'''</font><br/> | ||
[ | [https://projects.gctronic.com/wheelphone/WheelphoneAlarm.apk Wheelphone alarm] [https://play.google.com/store/apps/details?id=com.wheelphone.alarm <img width=20 src="https://www.gctronic.com/doc/images/google-play.png">WheelphoneAlarm] | ||
<font style="font-size:125%">'''Source'''</font><br/> | <font style="font-size:125%">'''Source'''</font><br/> | ||
| Line 461: | Line 461: | ||
<font style="font-size:125%">'''APK'''</font><br/> | <font style="font-size:125%">'''APK'''</font><br/> | ||
The android application can be downloaded from the Google Play store [https://play.google.com/store/apps/details?id=com.wheelphone.wheelphone&feature=search_result#?t=W251bGwsMSwyLDEsImNvbS53aGVlbHBob25lLndoZWVscGhvbmUiXQ.. <img width=20 src=" | The android application can be downloaded from the Google Play store [https://play.google.com/store/apps/details?id=com.wheelphone.wheelphone&feature=search_result#?t=W251bGwsMSwyLDEsImNvbS53aGVlbHBob25lLndoZWVscGhvbmUiXQ.. <img width=20 src="https://www.gctronic.com/doc/images/google-play.png">Wheelphone], or directly from [https://projects.gctronic.com/wheelphone/Wheelphone.apk Wheelphone.apk].<br/> | ||
<font style="font-size:125%">'''Source'''</font><br/> | <font style="font-size:125%">'''Source'''</font><br/> | ||
| Line 475: | Line 475: | ||
<font style="font-size:125%">'''APK'''</font><br/> | <font style="font-size:125%">'''APK'''</font><br/> | ||
The android application can be downloaded directly from [ | The android application can be downloaded directly from [https://projects.gctronic.com/wheelphone/WheelphoneOdomMotion-rev163.apk WheelphoneOdomMotion.apk].<br/> | ||
<font style="font-size:125%">'''Source'''</font><br/> | <font style="font-size:125%">'''Source'''</font><br/> | ||
| Line 489: | Line 489: | ||
The following figure show the interface of the application:<br/> | The following figure show the interface of the application:<br/> | ||
<span class="plainlinks">[ | <span class="plainlinks">[https://www.gctronic.com/doc/images/Screenshot-WPOdometryMotion.png <img width=100 src="https://www.gctronic.com/doc/images/Screenshot-WPOdometryMotion-small.png">]</span><br/> | ||
In the "Robot status" section are visualized: current left and right speed given to the robot (mm/s); the absolute position X (mm, pointing forward), Y (mm, pointing left), theta (degrees); the battery level | In the "Robot status" section are visualized: current left and right speed given to the robot (mm/s); the absolute position X (mm, pointing forward), Y (mm, pointing left), theta (degrees); the battery level | ||
| Line 498: | Line 498: | ||
<font style="font-size:125%">'''APK'''</font><br/> | <font style="font-size:125%">'''APK'''</font><br/> | ||
The android application can be downloaded directly from [ | The android application can be downloaded directly from [https://projects.gctronic.com/wheelphone/WheelphoneTargetDebug-rev181.apk WheelphoneTargetDebug.apk].<br/> | ||
<font style="font-size:125%">'''Source'''</font><br/> | <font style="font-size:125%">'''Source'''</font><br/> | ||
| Line 510: | Line 510: | ||
The following figure show the interface of the application:<br/> | The following figure show the interface of the application:<br/> | ||
<span class="plainlinks">[ | <span class="plainlinks">[https://www.gctronic.com/doc/images/Screenshot-TargetDebug.png <img width=100 src="https://www.gctronic.com/doc/images/Screenshot-TargetDebug-small.png">]</span><br/> | ||
* in the "Speed status" you can set the motors speed (mm/s) | * in the "Speed status" you can set the motors speed (mm/s) | ||
| Line 532: | Line 532: | ||
<font style="font-size:125%">'''APK'''</font><br/> | <font style="font-size:125%">'''APK'''</font><br/> | ||
[ | [https://projects.gctronic.com/wheelphone/Wheelphone_follow-rev156.apk Wheelphone follow] | ||
<font style="font-size:125%">'''Source'''</font><br/> | <font style="font-size:125%">'''Source'''</font><br/> | ||
| Line 560: | Line 560: | ||
<font style="font-size:125%">'''APK'''</font><br/> | <font style="font-size:125%">'''APK'''</font><br/> | ||
[ | [https://projects.gctronic.com/wheelphone/Wheelphone_recorder-rev159.apk Wheelphone recorder] | ||
<font style="font-size:125%">'''Source'''</font><br/> | <font style="font-size:125%">'''Source'''</font><br/> | ||
| Line 575: | Line 575: | ||
* Eclipse: 4.2 | * Eclipse: 4.2 | ||
* Android SDK API level: 18 (JELLY_BEAN_MR2) | * Android SDK API level: 18 (JELLY_BEAN_MR2) | ||
* Android NDK: r9 [ | * Android NDK: r9 [https://developer.android.com/tools/sdk/ndk/index.html Android NDK] | ||
'''Building process:''' | '''Building process:''' | ||
| Line 587: | Line 587: | ||
<font style="font-size:125%">'''APK'''</font><br/> | <font style="font-size:125%">'''APK'''</font><br/> | ||
[ | [https://projects.gctronic.com/wheelphone/Wheelphone_faceme-rev155.apk Wheelphone faceme] | ||
<font style="font-size:125%">'''Source'''</font><br/> | <font style="font-size:125%">'''Source'''</font><br/> | ||
| Line 601: | Line 601: | ||
<font style="font-size:125%">'''Summary'''</font><br/> | <font style="font-size:125%">'''Summary'''</font><br/> | ||
The demo shows the potentiality of having a mobile phone attached to the robot, in this example the phone is responsible of detecting a color blob and to send commands to the robot in order to follow it.<br/> | The demo shows the potentiality of having a mobile phone attached to the robot, in this example the phone is responsible of detecting a color blob and to send commands to the robot in order to follow it.<br/> | ||
A video of the this demo can be seen here [ | A video of the this demo can be seen here [https://www.gctronic.com/doc/index.php/Wheelphone-videos#Wheelphone_following_a_color_blob.2C_based_on_OpenCV video]. | ||
<font style="font-size:125%">'''Requirements building'''</font><br/> | <font style="font-size:125%">'''Requirements building'''</font><br/> | ||
Developer requirements (for building the project): | Developer requirements (for building the project): | ||
* [ | * [https://opencv.org/android OpenCV Android SDK] | ||
<font style="font-size:125%">'''Requirements running'''</font><br/> | <font style="font-size:125%">'''Requirements running'''</font><br/> | ||
| Line 612: | Line 612: | ||
<font style="font-size:125%">'''APK'''</font><br/> | <font style="font-size:125%">'''APK'''</font><br/> | ||
The android application can be downloaded from [ | The android application can be downloaded from [https://projects.gctronic.com/wheelphone/WheelphoneBlobDetection-rev160.apk WheelphoneBlobDetection.apk].<br/> | ||
<font style="font-size:125%">'''Source'''</font><br/> | <font style="font-size:125%">'''Source'''</font><br/> | ||
| Line 622: | Line 622: | ||
Once the application is started you will see that all the values are 0; that's normal, you have to select the blob to follow in order to start the hunting. Select the "Blob tab" and touch on the blob you want to follow; the robot should start moving, otherwise you need to restart the application (back button, turn off the robot, turn on the robot, select the app from the list).<br/> | Once the application is started you will see that all the values are 0; that's normal, you have to select the blob to follow in order to start the hunting. Select the "Blob tab" and touch on the blob you want to follow; the robot should start moving, otherwise you need to restart the application (back button, turn off the robot, turn on the robot, select the app from the list).<br/> | ||
The following figures show the interface of the application:<br/> | The following figures show the interface of the application:<br/> | ||
<span class="plainlinks">[ | <span class="plainlinks">[https://www.gctronic.com/doc/images/Screenshot1-BlobFollow.png <img width=100 src="https://www.gctronic.com/doc/images/Screenshot1-BlobFollow-small.png">]</span> | ||
<span class="plainlinks">[ | <span class="plainlinks">[https://www.gctronic.com/doc/images/Screenshot2-BlobFollow.png <img width=100 src="https://www.gctronic.com/doc/images/Screenshot2-BlobFollow-small.png">]</span><br/> | ||
==Line following== | ==Line following== | ||
| Line 630: | Line 630: | ||
<font style="font-size:125%">'''APK'''</font><br/> | <font style="font-size:125%">'''APK'''</font><br/> | ||
The android application can be downloaded from [ | The android application can be downloaded from [https://projects.gctronic.com/wheelphone/WheelphoneLineFollowing-rev162.apk WheelphoneLineFollowing.apk].<br/> | ||
<font style="font-size:125%">'''Source'''</font><br/> | <font style="font-size:125%">'''Source'''</font><br/> | ||
| Line 645: | Line 645: | ||
The following figure shows the interface of the application:<br/> | The following figure shows the interface of the application:<br/> | ||
<span class="plainlinks">[ | <span class="plainlinks">[https://www.gctronic.com/doc/images/Screenshot-LineFollow.png <img width=100 src="https://www.gctronic.com/doc/images/Screenshot-LineFollow-small.png">]</span><br/> | ||
<!-- | <!-- | ||
==Stay on the table== | ==Stay on the table== | ||
This demo shows how to exploit the four cliff sensors of the robot in order to let it move safely on the table wihtout falling down. <br/> | This demo shows how to exploit the four cliff sensors of the robot in order to let it move safely on the table wihtout falling down. <br/> | ||
The android application can be downloaded from [ | The android application can be downloaded from [https://projects.gctronic.com/wheelphone/wheelphone-stay-on-table-rev57-13.02.13.apk wheelphone-stay-on-table.apk] (Android >= 2.3.3).<br/> | ||
The source code of the application can be download from [ | The source code of the application can be download from [https://projects.gctronic.com/wheelphone/wheelphone-stay-on-table-rev57-13.02.13.zip wheelphone-stay-on-table.zip] (Eclipse project). | ||
--> | --> | ||
=Webots= | =Webots= | ||
Webots allows you to simulate the Wheelphone robot and program different behaviors for the robot in simulation before transferring them onto the real robot. You can download the Wheelphone simulation files from [ | Webots allows you to simulate the Wheelphone robot and program different behaviors for the robot in simulation before transferring them onto the real robot. You can download the Wheelphone simulation files from [https://www.cyberbotics.com/files/wheelphone/wheelphone.zip wheelphone.zip] (which includes several demo programs) as well as the corresponding student [https://www.cyberbotics.com/files/wheelphone/report.pdf report]. | ||
=Bootloader= | =Bootloader= | ||
The robot firmware can be easily updated through this app when a new version is available. Refer to the [ | The robot firmware can be easily updated through this app when a new version is available. Refer to the [https://www.gctronic.com/doc/index.php/Getting_started#Robot_firmware_update getting started] guide for more information on how to update your robot.<br/> | ||
The project is based on the example ''Web Bootloader Demo - OpenAccessory Framework'' contained in the [ | The project is based on the example ''Web Bootloader Demo - OpenAccessory Framework'' contained in the [https://www.microchip.com/stellent/idcplg?IdcService=SS_GET_PAGE&nodeId=2680&dDocName=en547784 Microchip Libraries for Applications].<br/> | ||
==Newest firmware== | ==Newest firmware== | ||
This bootloader version has to be used to update the robot to the last developed firmware with all new features and bugs corrected. Pay attention that this version breaks compatibility with old applications, section [ | This bootloader version has to be used to update the robot to the last developed firmware with all new features and bugs corrected. Pay attention that this version breaks compatibility with old applications, section [https://www.gctronic.com/doc/index.php/Android_software#Apps_shortcut_list Apps shortcut list] shows the list of compatible applications that depend on the Wheelphone library. <br/> | ||
<font style="font-size:125%">'''APK'''</font><br/> | <font style="font-size:125%">'''APK'''</font><br/> | ||
The android application can be downloaded directly from [ | The android application can be downloaded directly from [https://projects.gctronic.com/wheelphone/WheelphoneBootloader.apk WheelphoneBootloader.apk] (firmware rev 3.0).<br/> | ||
<font style="font-size:125%">'''Source'''</font><br/> | <font style="font-size:125%">'''Source'''</font><br/> | ||
| Line 670: | Line 670: | ||
==Older firmwares== | ==Older firmwares== | ||
This bootloader has to be used to return to the old firmware that is compatible with the applications developed before the Wheelphone Library release.<br/> | This bootloader has to be used to return to the old firmware that is compatible with the applications developed before the Wheelphone Library release.<br/> | ||
The android application can be downloaded from [ | The android application can be downloaded from [https://projects.gctronic.com/wheelphone/wheelphone-bootloader-rev2-rev96-12.06.13.apk wheelphone-bootloader.apk] (firmware rev 2.0).<br/> | ||
The source code of the application can be download from [ | The source code of the application can be download from [https://projects.gctronic.com/wheelphone/wheelphone-bootloader-rev2-rev96-12.06.13.zip wheelphone-bootloader.zip] (Eclipse project) | ||
==Hardware revision 0.1== | ==Hardware revision 0.1== | ||
This bootloader has to be used for robots numbered from 10 to 15; the firmware that will be uploaded to the robot is the same as described in section [ | This bootloader has to be used for robots numbered from 10 to 15; the firmware that will be uploaded to the robot is the same as described in section [https://www.gctronic.com/doc/index.php/Android_software#Newest_firmware Newest firmware]. <br/> | ||
The android application can be downloaded from [ | The android application can be downloaded from [https://projects.gctronic.com/wheelphone/wheelphone-bootloader-hw0.1-rev98-13.06.13.zip.apk wheelphone-bootloader.apk] (firmware rev 2.0).<br/> | ||
The source code of the application can be download from [ | The source code of the application can be download from [https://projects.gctronic.com/wheelphone/wheelphone-bootloader-hw0.1-rev98-13.06.13.zip wheelphone-bootloader.zip] (Eclipse project) | ||
=Calibration= | =Calibration= | ||
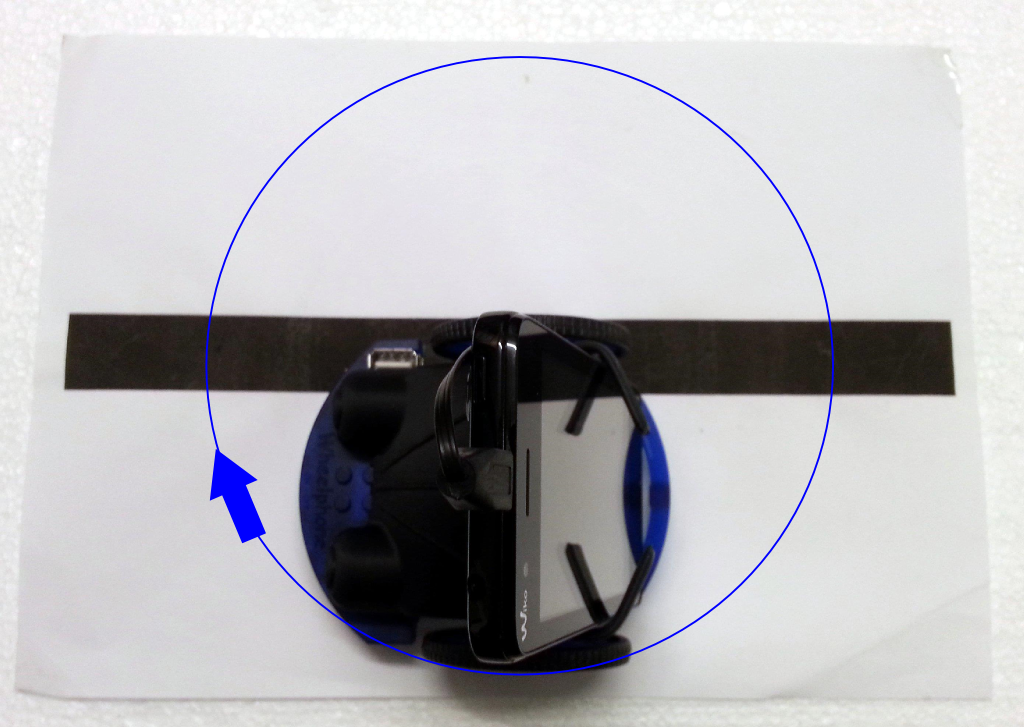
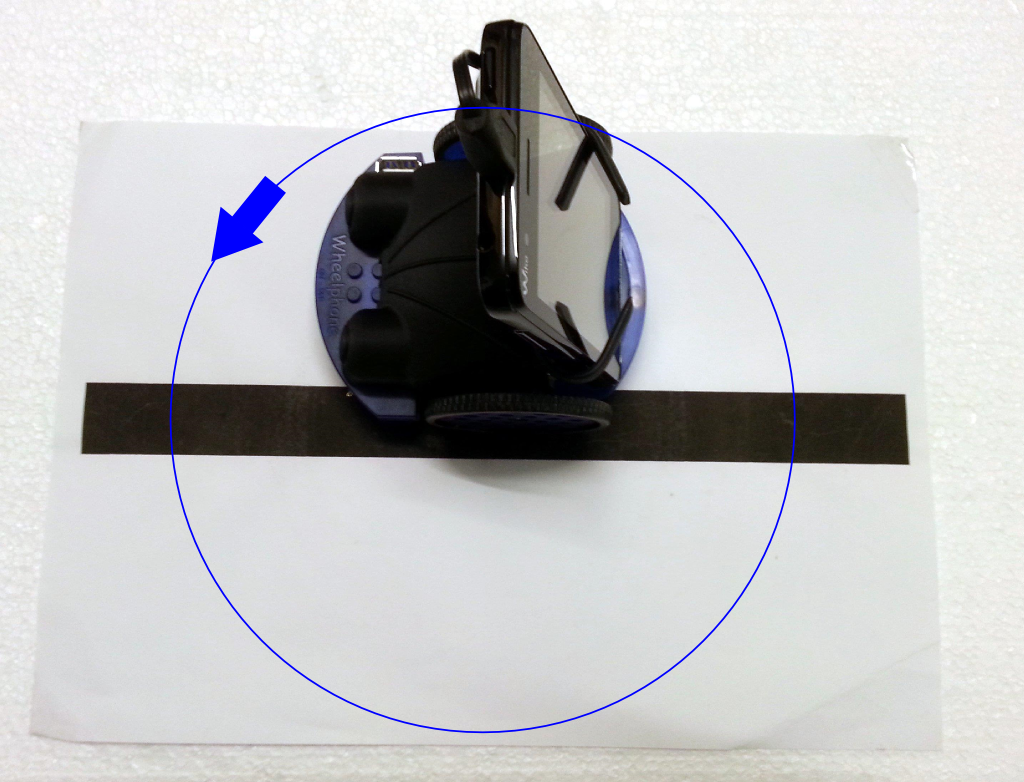
Since the motors can be slightly different a calibration can improve the behavior of the robot in terms of speed.<br/> | Since the motors can be slightly different a calibration can improve the behavior of the robot in terms of speed.<br/> | ||
An autonomous calibration process is implemented onboard: basically a calibration is performed for both the right and left wheels in three modes that are forward with speed control enabled, forward with speed control disabled and backward with speed control disabled. In order to let the robot calibrate istelf a white sheet in which a black line is drawed is needed; the robot will measure the time between detection of the line at various speed. The calibration sheet can be downloaded from the following link [ | An autonomous calibration process is implemented onboard: basically a calibration is performed for both the right and left wheels in three modes that are forward with speed control enabled, forward with speed control disabled and backward with speed control disabled. In order to let the robot calibrate istelf a white sheet in which a black line is drawed is needed; the robot will measure the time between detection of the line at various speed. The calibration sheet can be downloaded from the following link [https://projects.gctronic.com/wheelphone/calibration-sheet.pdf calibration-sheet.pdf]. <br/> | ||
A small application was developed to accomplish the calibration that can be downloaded from [ | A small application was developed to accomplish the calibration that can be downloaded from [https://projects.gctronic.com/wheelphone/WheelphoneCalibration-rev186.apk WheelphoneCalibration.apk]; simply follow the directions given. <br/> | ||
The source code is available from the following repository: | The source code is available from the following repository: | ||
<pre>svn checkout https://github.com/gctronic/wheelphone-applications/trunk/android-applications/WheelphoneCalibration WheelphoneCalibration</pre> | <pre>svn checkout https://github.com/gctronic/wheelphone-applications/trunk/android-applications/WheelphoneCalibration WheelphoneCalibration</pre> | ||
[ | [https://www.gctronic.com/doc/images/wp-calibration-left.png <img width=300 src="https://www.gctronic.com/doc/images/wp-calibration-left-small.png">] | ||
[ | [https://www.gctronic.com/doc/images/wp-calibration-right.png <img width=300 src="https://www.gctronic.com/doc/images/wp-calibration-right-small.png">] | ||
Latest revision as of 12:36, 27 January 2023
Apps shortcut list
- Basic demos, simple behaviour:
- Monitor application advanced: Visualize all the sensor information on the phone and implement "move-around-on-table" behavior. Wheelphone.apk,
 Wheelphone.
 - Wheelpone odometry: odometry debug WheelphoneOdometry.apk
- Wheelpone tag detection: marker detection debug WheelphoneTagDetection.apk
- Wheelphone follow: Follow the leader application. It allows the robot to follow an object in front of it, using the front facing proximity sensors. Wheelphone_follow.apk
- Wheelphone recorder: record video while moving. WheelphoneRecorder.apk
- Wheelphone faceme: Face-tracking application. It keeps track of the position of one face using the front facing camera, then controls the robot to try to face always the tracked face. WheelphoneFaceme.apk
- Wheelphone blob follow: the Wheelphone robot follows a blob chosen by the user through the interface. WheelphoneBlobDetection.apk
- Wheelphone line follow: it allows the robot to follow a black (or white) line on the floor using the ground sensors. WheelphoneLineFollowing.apk
- Monitor application advanced: Visualize all the sensor information on the phone and implement "move-around-on-table" behavior. Wheelphone.apk,
- Interactive apps:
- Wheelphone Pet: PET application. It makes the robot behave like a pet. A behavior module allows it to show expressions and behave accordingly. Additionally has a face-tracking and text-to-speech modules to be able to interact with the environment. WheelphonePet.apk WheelphonePet
- Wheelphone Alarm: Application that interfaces with the Wheelphone to provide a playful experience when the alarm rings. WheelphoneAlarm.apk, WheelphoneAlarm
- Wheelphone Pet: PET application. It makes the robot behave like a pet. A behavior module allows it to show expressions and behave accordingly. Additionally has a face-tracking and text-to-speech modules to be able to interact with the environment. WheelphonePet.apk
- Navigation apps:
- Wheelphone markers navigation: markers based navigation. WheelphoneTargetNavigation.apk WheelphoneTargetNavigation
- Wheelphone Navigator: environment navigation application. It allows the robot to navigate an environment looking for targets while avoiding obstacles. It has two modules to avoid the obstacles: (1)the robot’s front proximity sensors and (2)the camera + Optical Flow. WheelphoneNavigator.apk WheelphoneNavigator
- Wheelphone markers navigation: markers based navigation. WheelphoneTargetNavigation.apk
- ROS demo: the robot publishes sensors and image data and the computer subscribes to them
- phone-side: WheelphoneROS.apk, Wheelphone ROS.
- pc-side: ros pc-side binary files.
- phone-side: WheelphoneROS.apk,
Supported phones
Some phones are reported to not work due to missed system libraries; you can test if your phone should be supported with the following application: features.apk. From the list of features that is shown the android.hardware.usb.accessory must be present. If you are intereseted you can find the source code from the following link features.zip
Moreover the phone must be configured in order to accept installation of applications coming from different sources than Play Store.
Here is a list of phones that are tested to be working:
- Sony Ericsson Xperia arc LT15i (Android 2.3.4)
- Sony Ericsson Xperia Mini (Android 2.3.4, Android 4.0.4)
- Sony Ericsson Xperia tipo ST21i2 (Android 4.0.4)
- LG Nexus 4 (Android 4.2+)
- Samsung Galaxy S2 (Android 4.0.3)
- Samsung Galaxy S3 Mini (Android 4.1.1)
- Samsung Galaxy S3 (Android 4.1.2)
- Samsung Galaxy S4 (Android 4.2.2)
- Samsung Galaxy S Duos (Android 4.0.4)
- Huawei Ascend Y300 (Android 4.1.1)
- Huawei Ascend Y530 (Android 4.3)
Phones running Android 4.1 (or later) works with the new Android Open Accessory Protocol Version 2.0, thus you need to update to the latest robot firmware (>= rev43).
Let us know if your phone is working at the following address:

Wheelphone library
Wheelphone library to be used in android applications development to communicate with the robot (get sensors data and send commands).
The source code is available from the following repository:
svn checkout https://github.com/gctronic/wheelphone-library/trunk/android-wheelphone-library android-wheelphone-library-read-only
Alternatively you can download directly the jar file to be included in your project WheelphoneLibrary.jar.
You can find the API documentation in the doc folder or you can download it from WheelphoneLibrary.pdf.
ROS
Android side
ROS Fuerte
APK
The android application can be downloaded from the Google Play store ![]() Wheelphone ROS, or directly from WheelphoneROS.apk.
Wheelphone ROS, or directly from WheelphoneROS.apk.
Source
The source code is available from the following repository:
svn checkout https://github.com/gctronic/wheelphone-applications/trunk/android-applications/WheelphoneROS WheelphoneROS
It's based on the android_tutorial_pubsub contained in the android package.
Requirements building
How To
1) once the application is started the IP address of the computer running roscore need to be inserted, then press OK
2) on top of the window you should see "Connected" and right after the camera image that is sent to the computer; after some seconds you should receive the sensors values and the camera image in the computer. If you see "Robot disconnected" you need to restart the application
ROS Hydro
APK
The android application can be downloaded from directly from WheelphoneROShydro.apk.
Source
The source code is available from the following repository:
svn checkout https://github.com/gctronic/wheelphone-applications/trunk/android-applications/wheelphone_ros wheelphone_ros
How to build
- download and install Andorid Studio + SDK, refer to https://wiki.ros.org/android/Android%20Studio/Download
- sudo apt-get install ros-hydro-catkin ros-hydro-ros ros-hydro-rosjava python-wstool
- download android core frome the repo https://github.com/rosjava/android_core/tree/hydro and extract it to your preferred dir (e.g. ~/hydro_workspace/android)
- open Android Studio (run studio.sh) and open a project pointing to "~/hydro_workspace/android/android_core/settings.gradle" (refer to previous dir path); build the project (this can take a while...)
- download the "wheelphone_ros" project (svn repo) and put it inside the "android_core" directory
- modify the file "settings.gradle" inside the "android_core" directory in order to include also the "wheelphone_ros" project
- close and reopen Android Studio; the wheelphone project should be available for building
Alternatively you can download directly a virtual machine which includes all the system requirements you need to start playing with ROS and Wheelphone from the following link ROSHydro-WP.ova (based on the VM from https://nootrix.com/2014/04/virtualized-ros-hydro/); this is the easiest way!
How to run
1) once the application is started the IP address of the computer running roscore need to be inserted, then press Connect
2) on top of the window you should see "Connected" and right after the camera image that is sent to the computer; after some seconds you should receive the sensors values and the camera image in the computer. If you see "Robot disconnected" you need to restart the application
Useful links
- ROS Hydro Android
- ROS Hydro Android Development Environment
- https://wiki.ros.org/android/Android%20Studio
- https://developer.android.com/sdk/installing/studio-build.html
- https://code.google.com/p/rosjava-tf/
- https://github.com/rosjava/rosjava_mvn_repo
PC side
Summary
This is a monitor interface of the Wheelphone based on ROS:
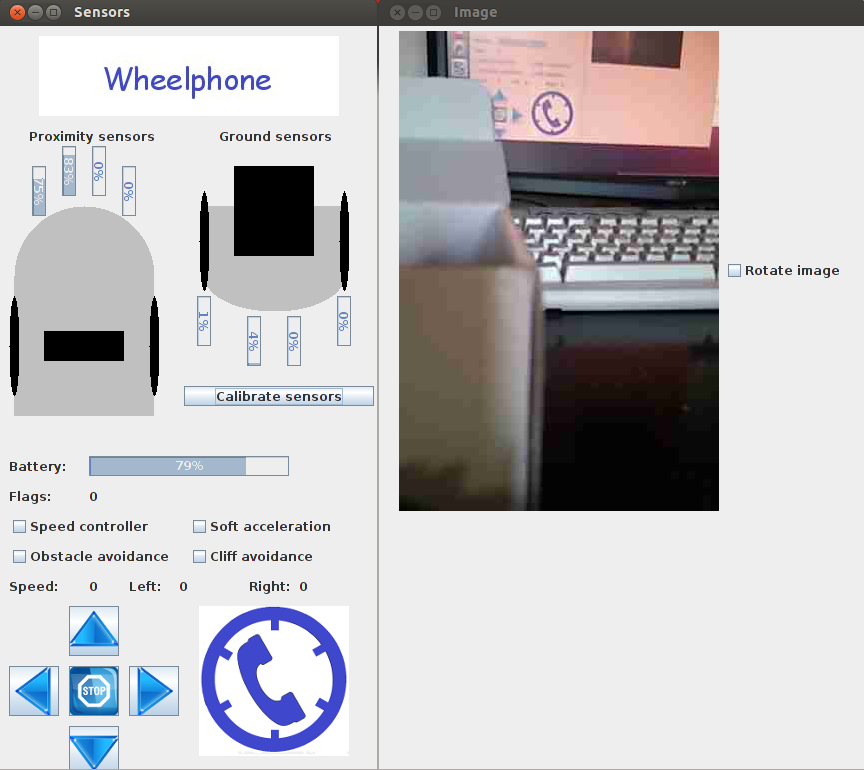
You can move the robot through the interface or through the keyboard: arrow keys to move and enter to stop.
Here is the nodes involved in ROS:
A video of the this demo can be seen here video.
ROS Fuerte
Requirements running
- ROS Fuerte (previous version not tested)
- rosjava, refers also to the rosjava_core documentation
Source
The source code is available from rosjava_tutorial_pubsub.zip. It's based on the rosjava_tutorial_pubsub contained in the rosjava package.
How To
Follow these steps to start the PC-side node:
- download the ros pc-side binary files
- modify the script start-ros.sh in the bin directory with the correct IP address of the host computer
- execute start-ros.sh (if the script isn't executable type chmod +x -R path-to/bin where bin is the bin directory of the zip)
ROS Hydro
Requirements
- ROS Hydro; you can download a virtual machine with ROS Hydro already installed (Ubuntu) from here https://nootrix.com/2014/04/virtualized-ros-hydro/
- rosjava; type the following commands in a terminal to install rosjava:
- sudo apt-get update
- sudo apt-get install openjdk-6-jre
- sudo apt-get install ros-hydro-rosjava
Alternatively you can download directly a virtual machine which includes all the system requirements you need to start playing with ROS and Wheelphone from the following link ROSHydro-WP.ova (based on the VM from https://nootrix.com/2014/04/virtualized-ros-hydro/); this is the easiest way!
How To Build
- cd ~/hydro_workspace/
- mkdir -p rosjava/src
- cd src
- catkin_create_rosjava_pkg rosjava_catkin_package_wheelphone
- cd ..
- catkin_make
- source devel/setup.bash
- cd src/rosjava_catkin_package_wheelphone
- catkin_create_rosjava_project my_pub_sub_tutorial
- cd ../..
- catkin_make
- download the pc-side project and substitute the "my_pub_sub_tutorial" directory with the content of the zip
- cd ~/hydro_workspace/rosjava
- catkin_make
How To Run
- open a terminal and type:
- export ROS_MASTER_URI=https://IP:11311 (IP should be the host machine IP, e.g. 192.168.1.10)
- export ROS_IP=IP (the same IP as before)
- open a second terminal and type the previous two commands
- in the first terminal type "roscore"
- in the second terminal type:
- cd ~/hydro_workspace/rosjava/src/rosjava_catkin_package_wheelphone/my_pub_sub_tutorial
- cd build/install/my_pub_sub_tutorial/bin
- ./my_pub_sub_tutorial com.github.rosjava_catkin_package_wheelphone.my_pub_sub_tutorial.Listener
Useful links
- rosjava
- rosjava installation
- Creating rosjava packages
- Writing a simple publisher and subscriber
- rosjava github
ROS Tools
- you can use rviz to visualize odometry information, type "rosrun rviz rviz" and open one of the following configuration files depending on your ROS version fuerte config hydro config.
- you can use rxgraph (fuerte) or rqt_graph (hydro) to visualize a diagram of the nodes and topics available in ROS simply type "rxgraph" or "rqt_graph" in a terminal
Summary
Wheelphone makes a tour of the apartment taking snapshot pictures and then returns back to the charging station.
This application shows the potentiality of the Wheelphone robot in an home environment. With the help of some target points identified with different markers, the Wheelphone robot is able to navigate from one room to the other localizing itself; moreover it takes pictures and uploads them to a web page. When the Wheelphone battery is low it can automatically charge itself thanks to the docking station.
There are two tabs: one illustrates some sensors values, the target detection information (direction and orientation), the current state of the robot and some others information; the second one shows the camera view and when a frame target is detected a nice augmented reality letter is visualized.
The application is designed for the following sequence:
- the robot moves around looking for the docking station; once detected it approaches the docking station and charges itself for a while
- the robot goes out of the charger, takes a picture and then looks around for the first marker (living room); once detected it goes towards the marker until it reaches it, rotates 180 degrees and takes a picture
- the robot looks for the next target (kitchen); once detected it goes towards the marker and takes a picture. Then the sequence is repeated.
In the "Robot" tab you can see the HTTP address to which to connect in order to see the pictures taken by the robot.
Frame target detection is performed using the Vuforia Augmented Reality SDK (license agreements: https://developer.vuforia.com/legal/license).
A nice video of the demo can be seen here video.
The following image shows the history of a complete tour taken from the HTTP page published by the Wheelphone:
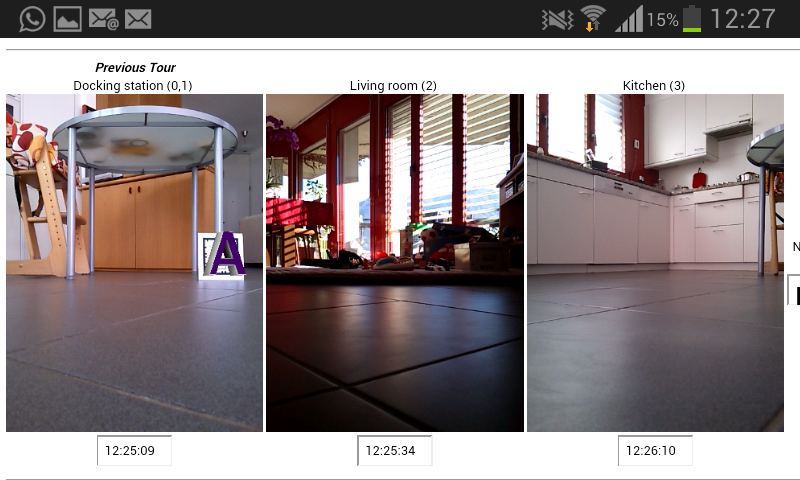
The markers used in the demo can be donwloaded from here: charger station, living room, kitchen.
A similar application was developed also for iPhone, have a look here for more information.
APK
The android application can be downloaded from the Google Play store ![]() Wheelphone markers navigation, or directly from WheelphoneTargetNavigation.apk.
Wheelphone markers navigation, or directly from WheelphoneTargetNavigation.apk.
Source
The source code is available from the following repository:
svn checkout https://github.com/gctronic/wheelphone-applications/trunk/android-applications/WheelphoneTargetNavigation WheelphoneTargetNavigation
A version of the application without rendering on the phone display (no 3D letter visualized on target position) is available from the following repositoriy; this version was created since the rendering causes the application to be unstable:
svn checkout https://github.com/gctronic/wheelphone-applications/trunk/android-applications/WheelphoneTargetNavigation_no_rendering WheelphoneTargetNavigation_no_rendering
How To
1) prepare the docking station with the marker charger station, the "navigation targets" with markers living room and kitchen and place them in a triangular shape in such a way that form the docking station the robot is able to detect the "living room", from the "living room" the robot is able to detect the "kitchen" and from the kitchen the robot is able to detect the docking station, like shown in the following figures:

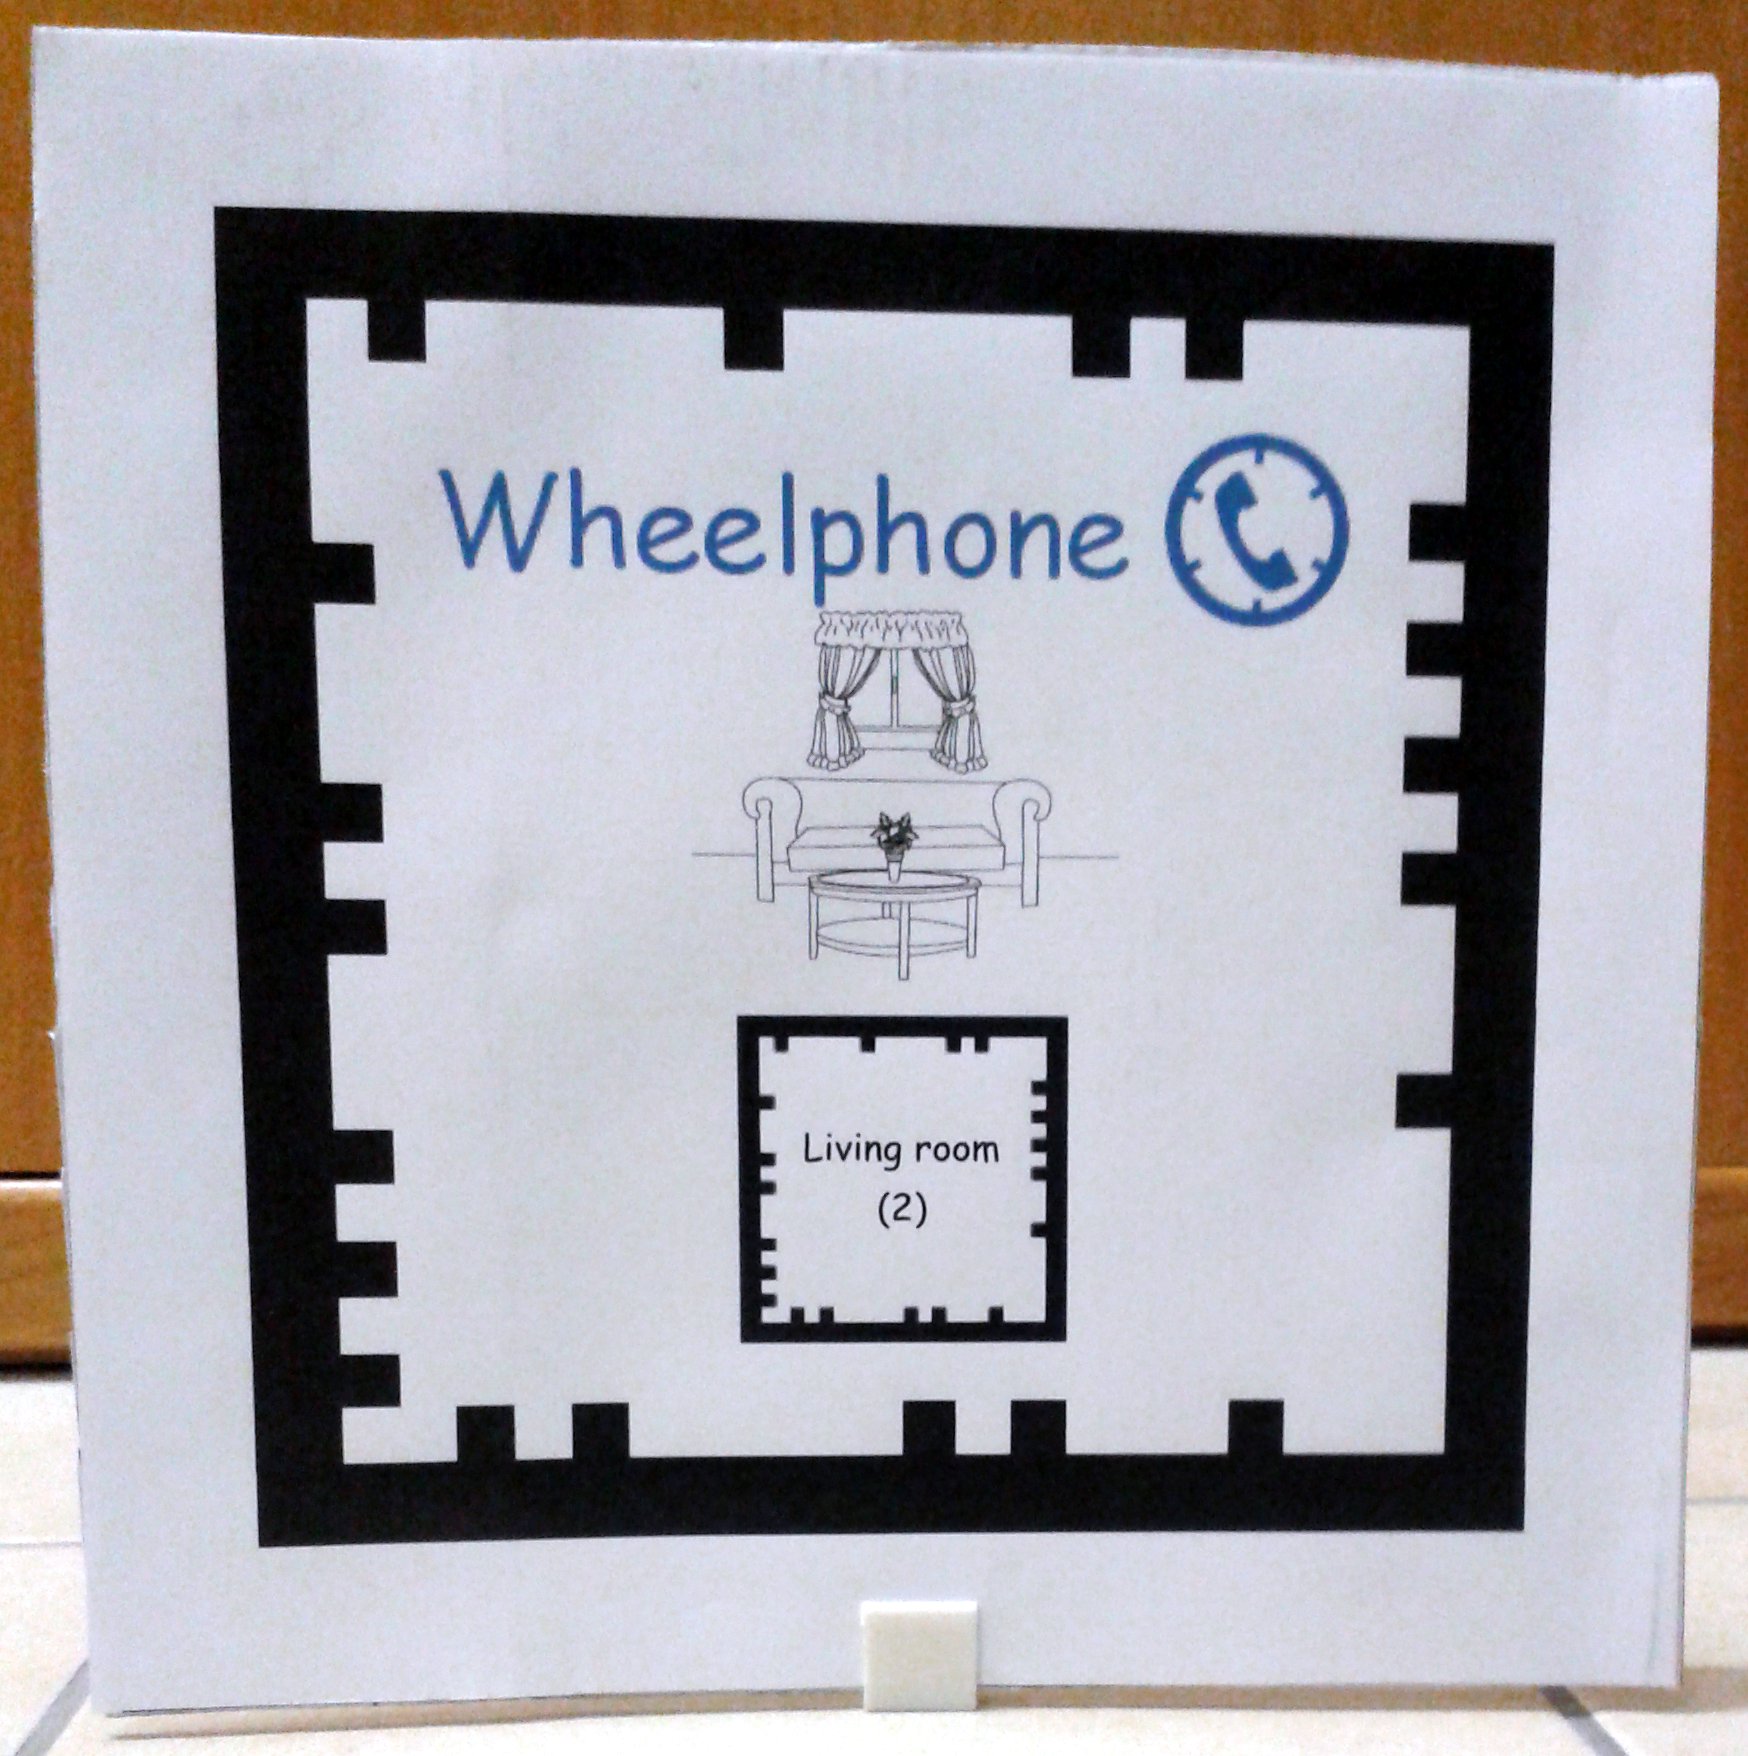
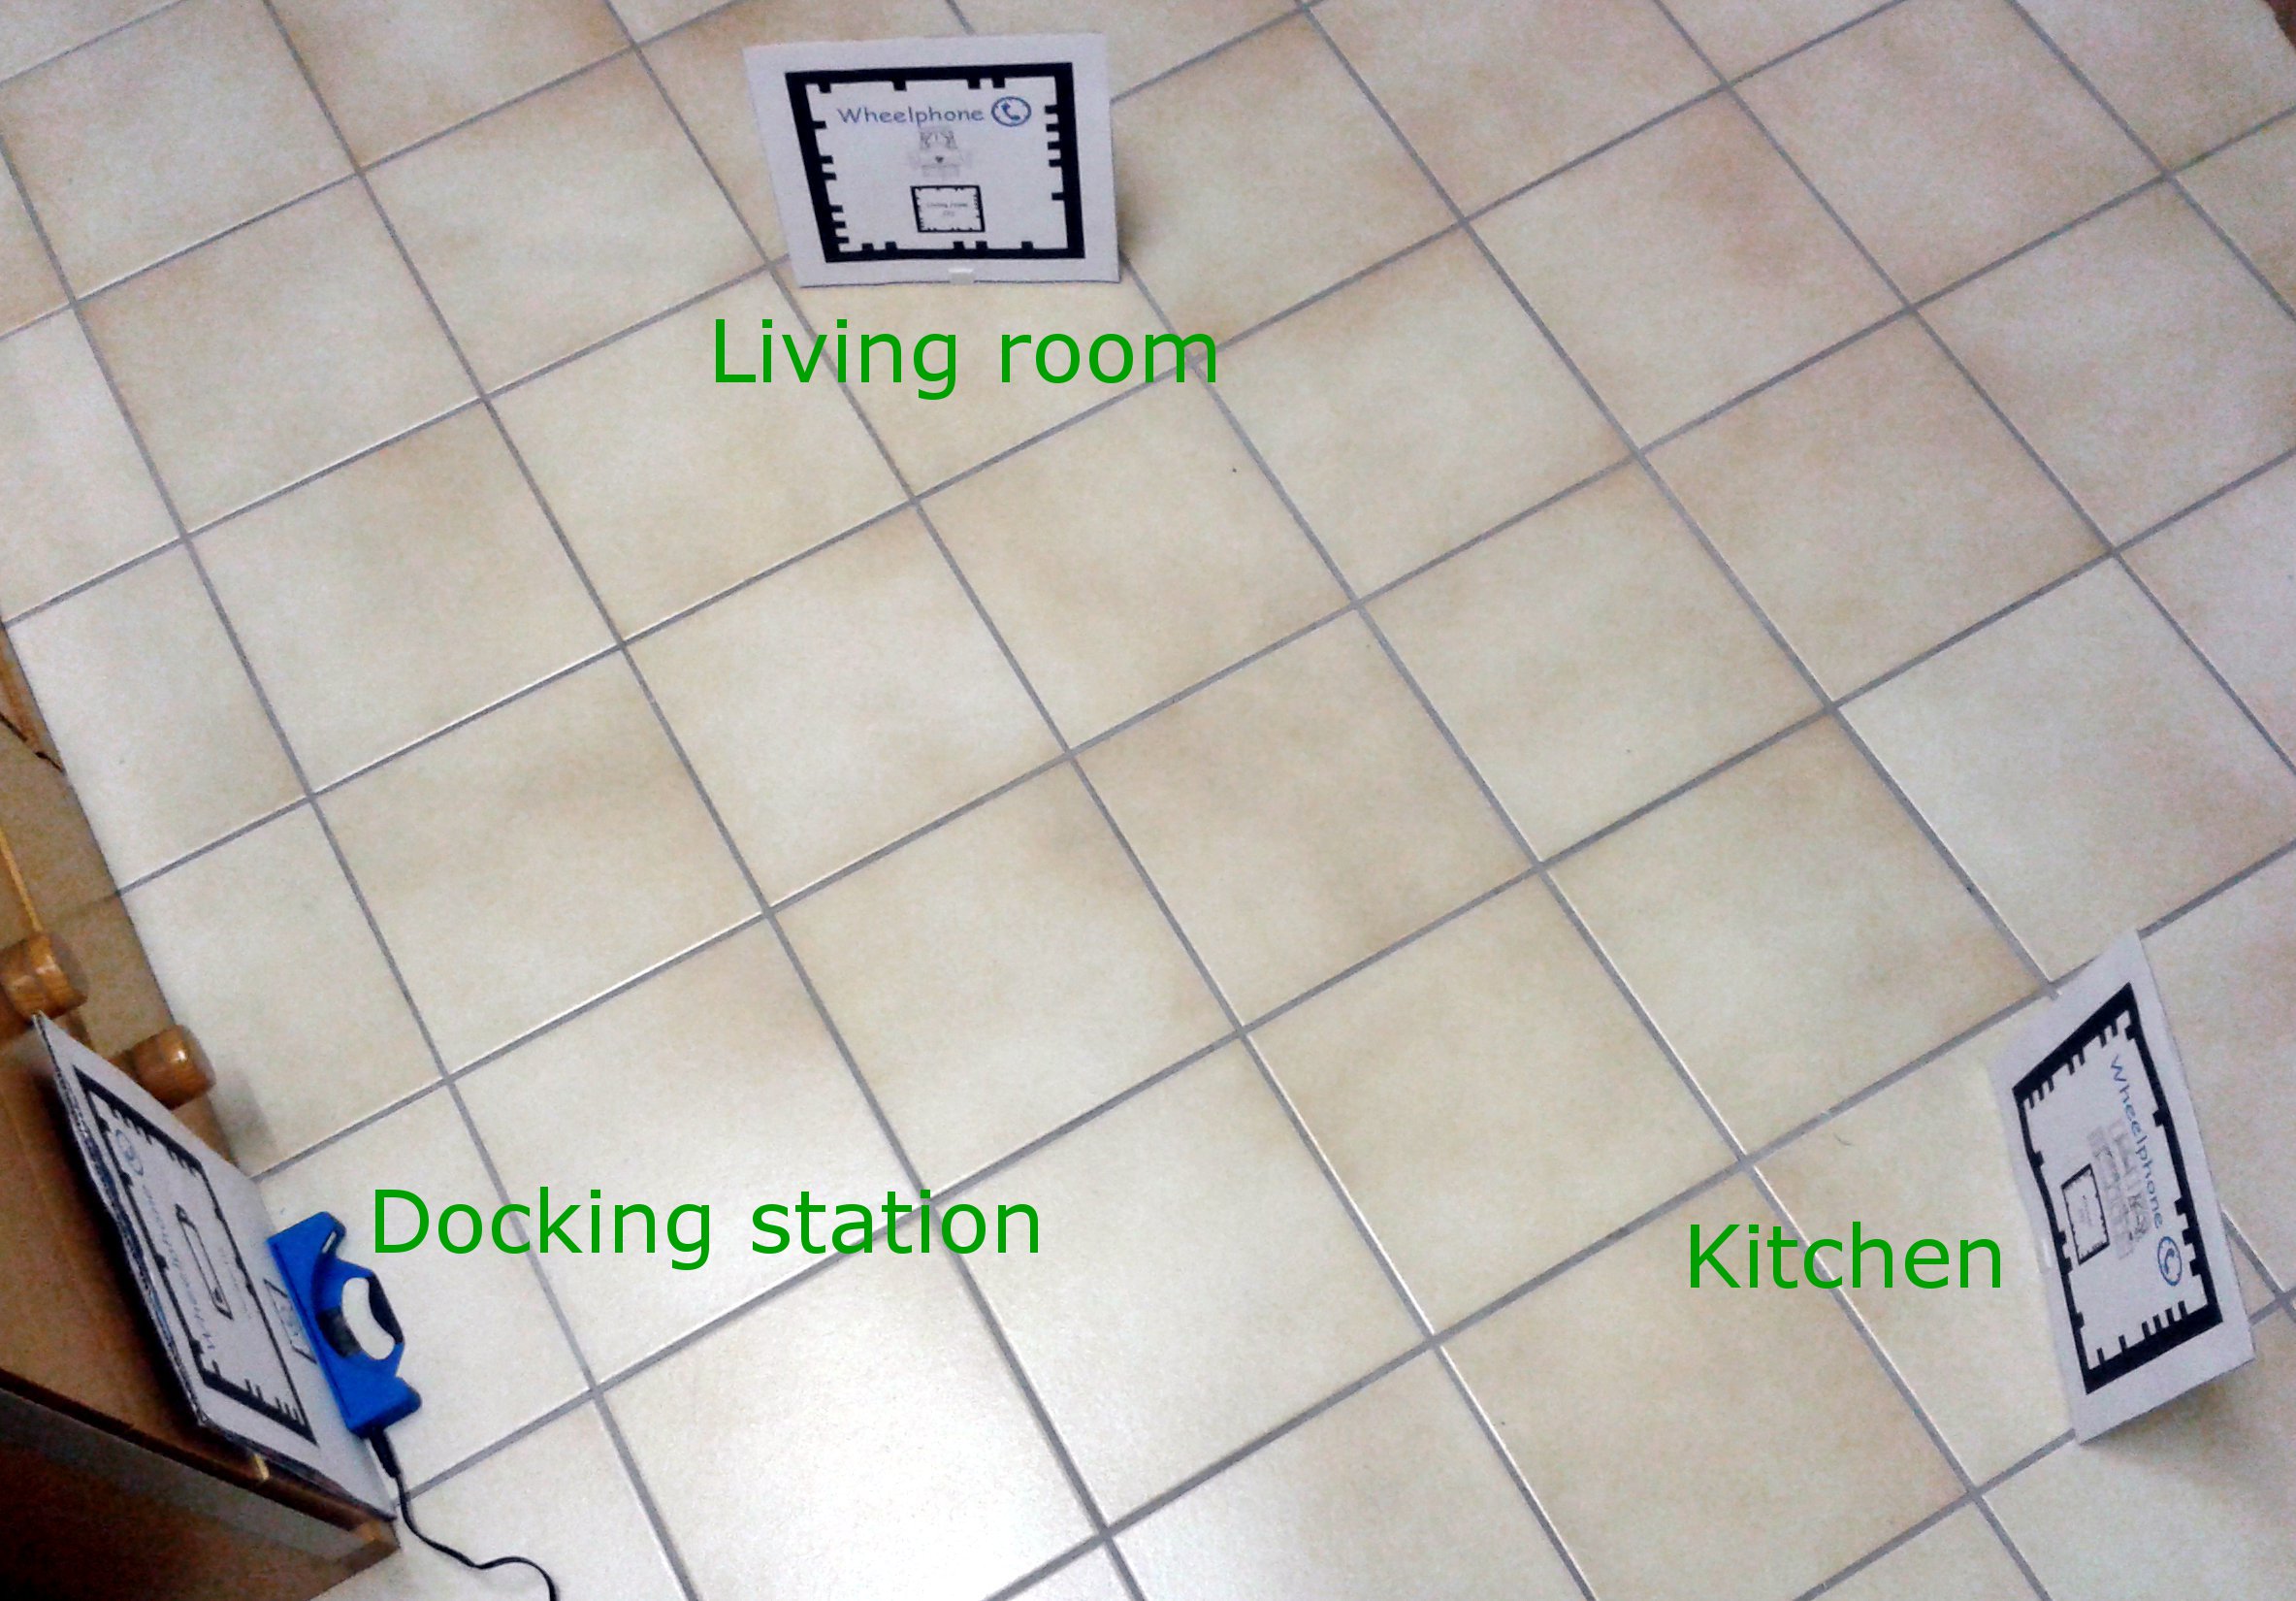
2) once the application is started you should see "Connected" on top of the window, otherwise you need to restart the application (back button, turn off the robot, turn on the robot, select the app from the list)
3) the robot start searching (pivot rotation) the marker id 2 (living room); when the robot finds the marker it goes towards it until it is near, then it rotates for about 180 degrees saying what target it found and then takes a picture that will be automatically updated on the web page. In case the marker isn't found then after 30 seconds the robot start searching the next target
4) the searching sequence is: target id 2 (living room), target id 3 (kitchen), target id 0/1 (charger station). When the robot is approaching the charging station it need two id, one big to be detected at long distances and one small used to center itself to the docking station when it is near the charger. If the robot fails to connect to the charger station, then it applies some movements to try making a good contact with the charger; anyway in case after a while it hasn't reach the contact then it search for the next target. In case of success it charges itself for a while (user definable), then it goes out of the charger, rotates for about 180 degrees saying what target it found and then takes a picture.
The following figure explains the values and parameters available in the application:
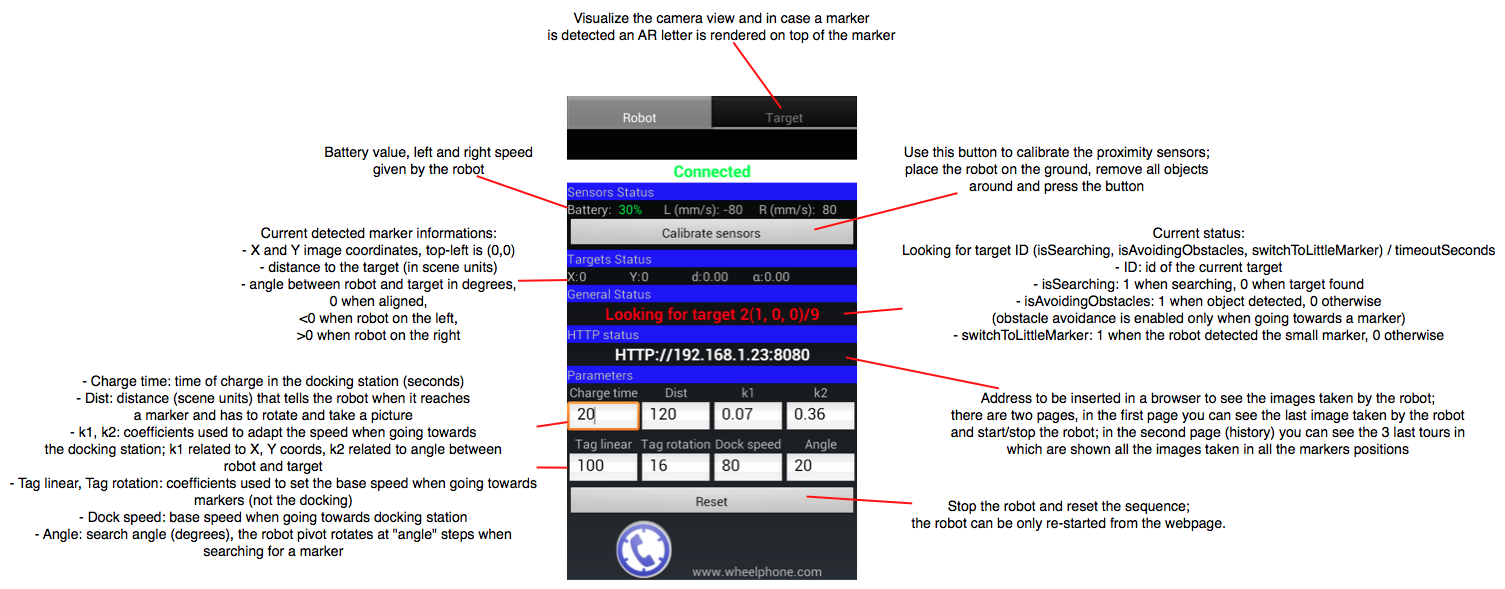
Summary
This is a navigation application. It allows the robot to navigate an environment looking for targets while avoiding obstacles. It has two modules to avoid the obstacles: (1)the robot’s front proximity sensors and (2)the camera + Optical Flow.
Requirements building
- Eclipse: 4.2
- Android SDK API level: 18 (JELLY_BEAN_MR2)
- Android NDK: r9 Android NDK
- OpenCV: 2.4.6 OpenCV Android SDK
Requirements running
- Android API version: 14 (ICE_CREAM_SANDWICH)
- Back camera
- OpenCV: 2.4.6 OpenCV mangager (Android app)
Building process
- This application has some JNI code (C/C++), so it is necessary to have the android NDK to compile the C/C++ code. Once you have the NDK, the C/C++ code can be compiled by running (while at the jni folder of the project):
${NDKROOT}/ndk-build –B
Note: Make sure that the NDKROOT and OPENCVROOT environment variables are set to the NDK and OpenCV SDK paths respectively.
APK
WheelphoneNavigator.apk ![]() WheelphoneNavigator
WheelphoneNavigator
Source
svn checkout https://github.com/gctronic/wheelphone-applications/trunk/android-applications/Wheelphone_navigator Wheelphone_navigator
How To
How to interact with the application: add at least two targets and then tap on “start”. This makes the robot go between all the targets in its list, while avoiding the obstacles.
Autonomous docking
Wheelphone blob docking
Summary
This demo uses OpenCV to detect a colored blob placed on the charging station; the blob is used to give the robot a direction to follow to reach the docking station. When the robot is near the docking it detect a black line (placed on the ground) and follow it to correctly orient itself towards the charging contacts. The project contains also a stripped version of Spydroid (only HTTP server) that let the user start and stop the demo remotely from a PC or another phone.
Requirements building
Developer requirements (for building the project):
Requirements running
User requirements (to run the application on the phone):
- the OpenCV package is required to run the application on the phone; on Google Play you can find OpenCV Manager that let you install easily the needed library
APK
The android application can be downloaded from the Google Play store ![]() Wheelphone blob docking, or directly from WheelphoneBlobDocking.apk.
Wheelphone blob docking, or directly from WheelphoneBlobDocking.apk.
Source
The source code is available from the following repository:
svn checkout https://github.com/gctronic/wheelphone-applications/trunk/android-applications/WheelphoneBlobDocking WheelphoneBlobDocking
How To
1) once the application is started the robot start moving around with obstacle avoidance enabled looking for a docking station
2) take the robot in your hands and press the "Blob tab" that show you the camera view. Point the robot to the docking station and touch on the screen to select the blob to follow as shown in the following figure:
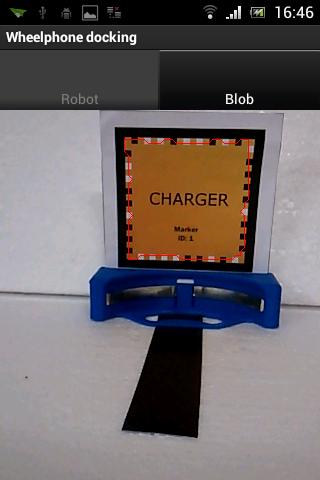
3) place the robot on the ground and press the "Calibrate sensors" button to calibrate the robot in your environment; be sure to remove any object near the robot
4) set a threshold corresponding to the value of the ground sensors related to the black line used to centering to the docking station; if the ground sensor value < threshold then the black line is detected
5) place the robot away from the charger (1 or 2 meters) and let it try to dock itself; when the robot reaches the charging station it will stay there
There is also a web page you can navigate with any browser inserting the address given in the "Robot tab"; in this page you'll see 5 motion commands (forward, backward, left, right, stop); stop is used to stop the robot, the others to start the robot.
Wheelphone target docking
Summary
This demo uses the Vuforia Augmented Reality SDK to detect a frame target placed on the charging station; the target is used to give the robot a direction to follow to reach the docking station. With this library you get also the orientation of the robot respect to the target, that is respect to the charger; with this information it's easier for the robot to be aligned to the charging station before reaching it. The project contains also a stripped version of Spydroid (only HTTP server) that let the user start and stop the demo remotely from a PC or another phone.
A video of the this demo can be seen here video.
Requirments building
Developer requirements (for building the project):
APK
The android application can be downloaded from the Google Play store ![]() Wheelphone target docking, or directly from WheelphoneTargetDocking.apk.
Wheelphone target docking, or directly from WheelphoneTargetDocking.apk.
Source
The source code is available from the following repository:
svn checkout https://github.com/gctronic/wheelphone-applications/trunk/android-applications/WheelphoneTargetDocking WheelphoneTargetDocking
How To
1) prepare the docking station with the marker charger station as shown in the following figure:
2) once the application is started you should see "Connected" on top of the window, otherwise you need to restart the application (back button, turn off the robot, turn on the robot, select the app from the list)
3) the robot starts searching for the charging station rotating on place at little steps
4) take the robot on your hands, place it on the ground and press "Calibrate sensors" (remove any object near the robot); if the phone camera is not centered you can also set a camera offset (move the slider in the position of the phone camera)
5) place the robot away from the charger (1 or 2 meters) and let it try to dock itself; when the robot reaches the charging station it will stay there
There is also a web page you can navigate with any browser inserting the address given in the "Robot tab"; in this page you'll see 5 motion commands (forward, backward, left, right, stop); stop is used to stop the robot, the others to start the robot.
The "Target tab" shows the camera view and when a marker is detected a nice augmented reality letter is visualized; this can be used to know the maximum distance at which the charging station can be still detected.
Remote control
Telepresence with Skype
Summary
Wheelphone allows worldwide telepresence simply using Skype. One can have a real time video feedback from a remote place where the robot is moving. To control the Wheelphone robot movement, just open the Skype numpad and pilot the robot while seeing the real time images.
A video of the this demo can be seen here video.
How To
- start Skype application on the phone and login
- connect the sound cable to the phone in order to send commands from Skype to the robot; make sure that Skype recognizes the robot as earphone, if this isn't the case try to disconnect and reconnect the audio cable
- remove the micro USB cable from the phone because USB communication has priority over the audio communication at the moment
- enable the "Answer call automatically" option in the Skype settings in order to automatically respond to incoming call and be able to immediately control the robot
- start the Skype application in the computer (or alternatively from another phone), login and make a video call to the account you use on the phone connected to the robot (if you are in the same room disable the microphone)
- now you should be able to get the robot view; open the Skype numpad on the computer side and use it to move the robot, the commands are shown in the following figure:

Wheelphone remote
Summary
The robot can be easily controlled via a browser after having configured the computer and the robot to be in the same wifi network. The project is based on the spydroid (v6.0) application, refer to https://code.google.com/p/spydroid-ipcamera/ for more information.
APK
The android application can be downloaded from the Google Play store ![]() Wheelphone remote, or directly from WheelphoneRemote.apk.
Wheelphone remote, or directly from WheelphoneRemote.apk.
Source
The source code is available from the following repository:
svn checkout https://github.com/gctronic/wheelphone-applications/trunk/android-applications/WheelphoneRemote WheelphoneRemote
How To
1) make sure to have the latest VLC plugin installed on the computer; unfortunately there is no VLC plugin for mobile phone so at the moment the video cannot be visualized if a connection phone to robot is performed (only movment commands are available).
2) connect the phone and the computer within the same network
3) once the application is started you'll see the address to be inserted in the browser to be able to control the robot; open a browser and insert the address; if all is working well you'll see the following html page:
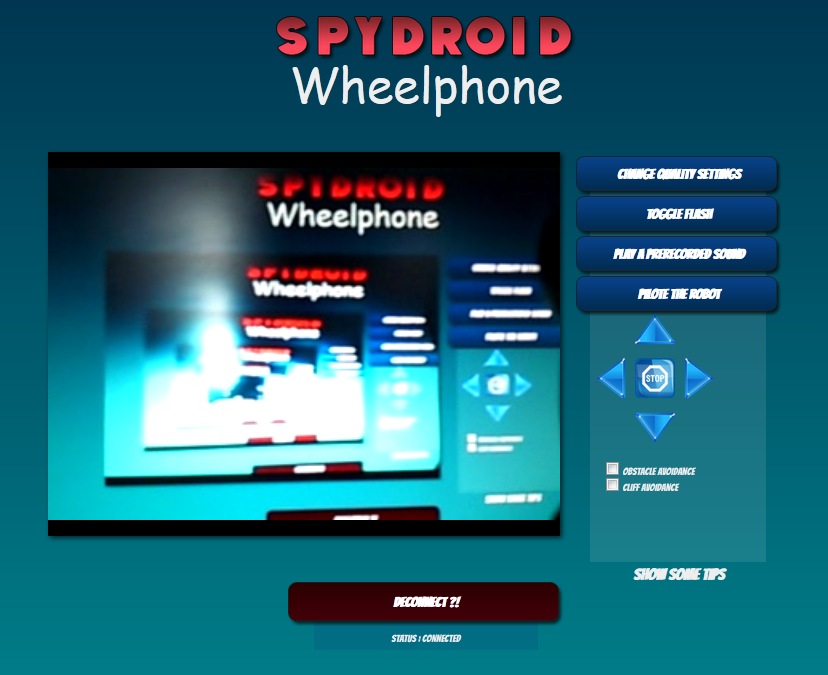
4) click on the "Connect" button in the html page and you should receive the video stream; on the right you've some commands to send to the robot, i.e. sounds, motions, ...
Wheelphone remote mini
Summary
This is a stripped version of Wheelphone remote that contains only an HTTP server used to receive the motion commands for the robot. It is implemented to have a minimal interface to pilot the robot both from the PC and another phone.
Moreover the Vuforia Augmented Reality SDK is used to track a marker when it is in the robot view (pivot rotation at the moment).
APK
The android application can be downloaded from the ![]() Wheelphone remote mini, or directly from WheelphoneRemoteMini.apk.
Wheelphone remote mini, or directly from WheelphoneRemoteMini.apk.
Source
The source code is available from the following repository:
svn checkout https://github.com/gctronic/wheelphone-applications/trunk/android-applications/WheelphoneRemoteMini WheelphoneRemoteMini
it is based on the Spydroid application.
How To
1) connect the phone and the computer within the same network
2) once the application is started you'll see the address to be inserted in the browser to be able to control the robot; open a browser and insert the address; if all is working well you'll see the following html page:
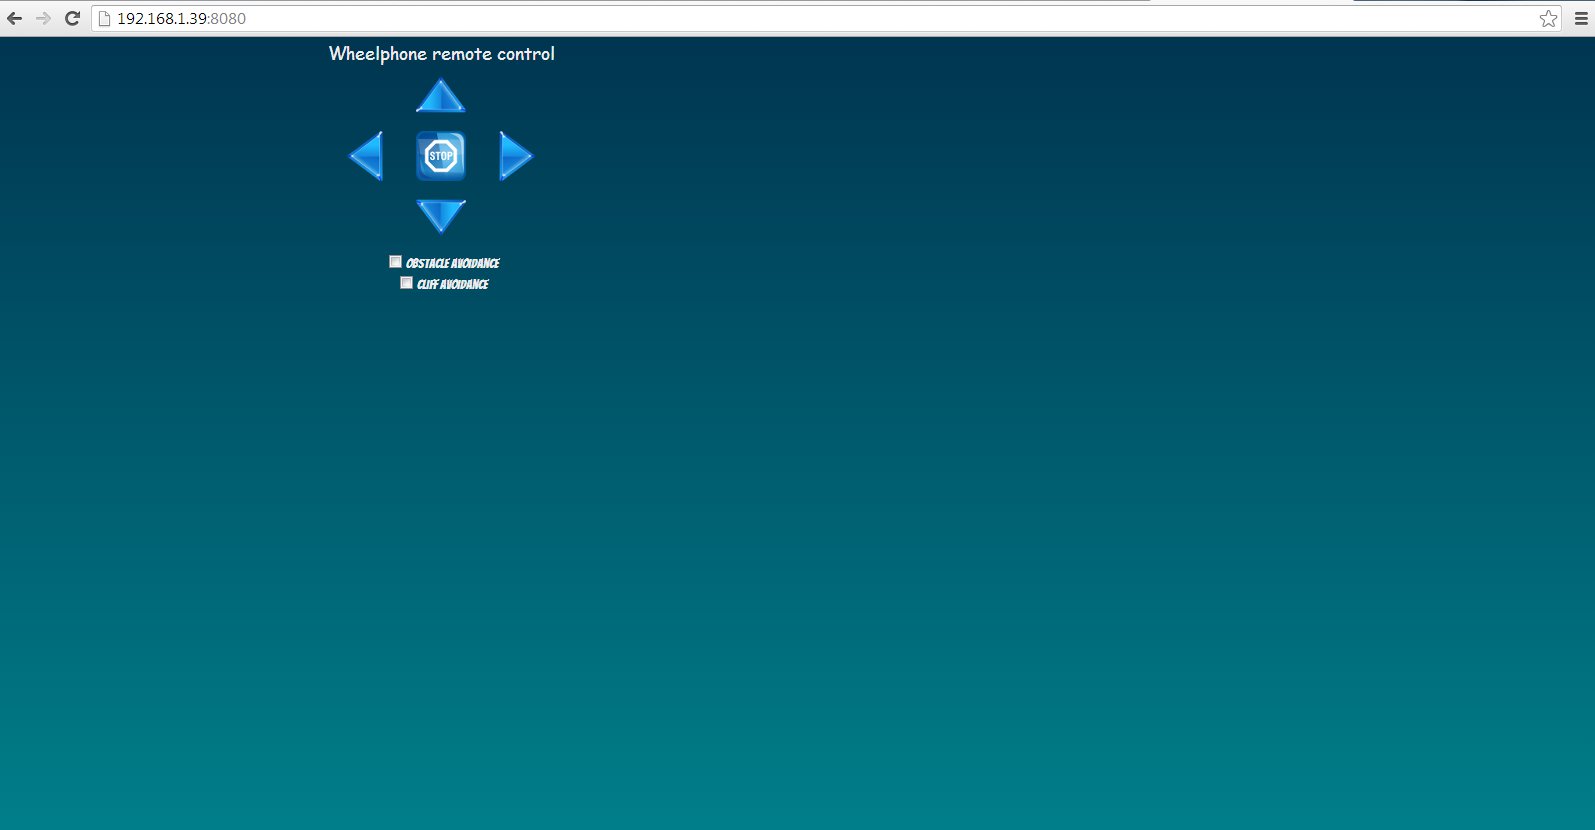
3) press the "Start animation" button to start the visualization of various images that will change based on the commands sent to the robot through the html page; coupled with the images there will be also sounds related to motion commands
If you try to raise the Wheelphone robot, or place an object near the front proximity sensors you'll see a reaction from the robot.
Moreover you can place a marker (ID0 or ID1) on front of the robot and the robot will start to follow it (pivot rotation only), moreover information about the target will be shown on the screen, like in the following figure:
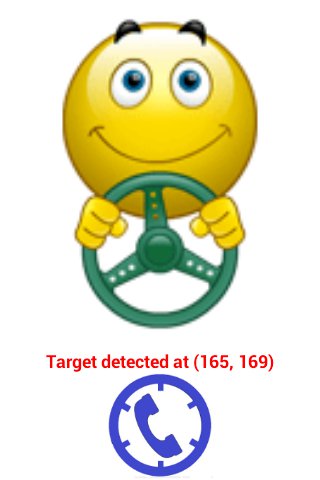
Telepresence with Skype and Wheelphone remote mini
Summary
Wheelphone allows worldwide telepresence by using Skype for audio/video coupled with the Wheelphone remote mini application to issue motion commands.
In order to access the Wheelphone remote mini webserver from Internet, we configured the port forwarding rule on the router through the "UPnP - Internet Gateway Device" protocol; this is done automatically by
an application (see following section for the source code).
Source
The source code of the "UPnP-IGD" application is available from UPnP-IGD.zip. This application setup a forwarding rule to the current device on port 8080.
How To
- start Skype application on the phone and login
- connect the micro USB cable to the phone and start the Wheelphone remote mini application
- enable the "Answer call automatically" option in the Skype settings in order to automatically respond to incoming call and be able to immediately control the robot; if this option is not available you would need to answer manually the call
- start the application "UPnP-IGD" (it requires that UPnP protocol is enabled in the router); the application will show the public address to enter in order to reach the Wheelphone remote mini webserver
- start the Skype application in the computer (or alternatively from another phone), login and make a video call to the account you use on the phone connected to the robot
- on the same computer open a browser and enter the public address given by the "UPnP-IGD" application
- now you should be able to get the robot view from skype and you can control the robot through the browser
Interactive demos
Wheelphone Pet
Summary
This is a PET application. It makes the robot behave like a pet. A behavior module allows it to show expressions and behave accordingly. Additionally has a face-tracking and text-to-speech modules to be able to interact with the environment.
Requirements building
- Eclipse: 4.2
- Android SDK API level: 18 (JELLY_BEAN_MR2)
- Android NDK: r9 Android NDK
Building process:
- This application has some JNI code (C/C++), so it is necessary to have the android NDK to compile the C/C++ code. Once you have the NDK, the C/C++ code can be compiled by running (while at the jni folder of the project):
${NDKROOT}/ndk-build –B
Note: Make sure that the NDKROOT environment variable is set to the NDK path
Requirements running
- Android API version: 14 (ICE_CREAM_SANDWICH)
- Front facing camera
APK
WheelphonePet.apk ![]() WheelphonePet
WheelphonePet
Source
svn checkout https://github.com/gctronic/wheelphone-applications/trunk/android-applications/Wheelphone_pet Wheelphone_pet
State:
- Speech recognition has been partially implemented using googles API. It would be better to use cmusphinx.
- The FaceExpressions module, used to express the robot state, could be extended to support animations instead of static images. For this purpose, libgdx can be used.
How To
How to interact with the application: start the application and stand where the phone can see your face.
Wheelphone Alarm
Summary
This is an alarm application that interfaces with the Wheelphone to provide a playful experience when the alarm rings.
Requirements building
- Eclipse: 4.2
- Android SDK API level: 18 (JELLY_BEAN_MR2)
Building process:
- Nothing special: download the code, import to Eclipse and run.
Requirements running
- Android API version: 14 (ICE_CREAM_SANDWICH)
- Proximity sensor on the phone
APK
Wheelphone alarm ![]() WheelphoneAlarm
WheelphoneAlarm
Source
svn checkout https://github.com/gctronic/wheelphone-applications/trunk/android-applications/Wheelphone_alarm Wheelphone_alarm
State: It is a concept app, so it actually does not actually ring.
How To
It is possible to set the alarm time, the escape speed and a delay in which the robot will be stopped before starting escaping around when ringing. The alarm can be set to anytime within the next 24 hours.
When the alarm is ringing, the phone proximity sensor will also detect the approaching hand and will make the robot run away from the hand. In order to setup an alarm follow these steps:
- once the application is started you should see "Connected" on top of the window, otherwise you need to restart the application (back button, turn off the robot, turn on the robot, select the app from the list)
- setup an alarm (or use the "quick alarm" button to set an alarm in the next 5 seconds); choose also the desired escape speed and waiting time
- press the home button to leave the application running in the background, this way you can still use your phone to do others thinks; be aware not to press the back button because you'll terminate the application
- press the power button to put the phone in sleep and put the phone on its charger station (hint: place the robot near your bed)
- wake up!
The alarm song that is played is the one chosen in the system.
Basic demos
Monitor advanced
Summary
This is the Wheelphone demo that shows you all the sensors values (proximity, ground, battery) and let you move the robot and sets some onboard behaviors. This is the first application that you will probably install to start playing with the robot.
APK
The android application can be downloaded from the Google Play store ![]() Wheelphone, or directly from Wheelphone.apk.
Wheelphone, or directly from Wheelphone.apk.
Source
The source code is available from the following repository:
svn checkout https://github.com/gctronic/wheelphone-applications/trunk/android-applications/Wheelphone Wheelphone
How To
The application has two tabs, in left one the sensors information are displayed, in the right one you can choose to start the "stay-on-the-table" behavior that basically let the robot move safely on any table (not a black one though) without the risk to falling down (put the robot on the table before starting the behavior).
Wheelphone odometry
Summary
This is a demo that can be used as a starting point to work with the odometry information received from the robot. The application let the robot either rotate in place by an angle (degrees) specified by the user or move forward/backward for a distance (cm) specified by the user.
APK
The android application can be downloaded directly from WheelphoneOdomMotion.apk.
Source
The source code is available from the following repository:
svn checkout https://github.com/gctronic/wheelphone-applications/trunk/android-applications/WheelphoneOdomMotion WheelphoneOdomMotion
How To
- once the application is started you should see "Connected" on top of the window, otherwise you need to restart the application (back button, turn off the robot, turn on the robot, select the app from the list)
- set the movement speed in the "Settings" section (given in mm/s)
- now you can decide whether to do a rotation (robot rotates on place for the given degrees) or a linear movement (robot goes forward for the given distance in cm); set the desired value and press the related "GO" button based on the motion you want to do
- if you want to stop the robot you can press the "Stop robot" button in any moment
The following figure show the interface of the application:
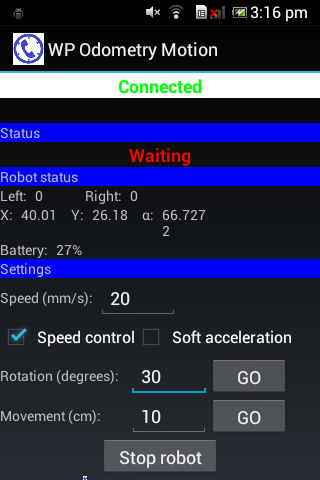
In the "Robot status" section are visualized: current left and right speed given to the robot (mm/s); the absolute position X (mm, pointing forward), Y (mm, pointing left), theta (degrees); the battery level
Wheelphone tag detection
Summary
This is a demo that can be used as a starting point to work with the vuforia tag detection library (https://developer.vuforia.com/). You can use this application to get useful information about the tag detected such as distance and angle; you can analyse the performance of the tag detection for instance setting a speed and seeing the maximum speed at which the robot can still detect the tag rotating in place, or seeing the maximum distance at which the phone can detect the tag.
APK
The android application can be downloaded directly from WheelphoneTargetDebug.apk.
Source
The source code is available from the following repository:
svn checkout https://github.com/gctronic/wheelphone-applications/trunk/android-applications/WheelphoneTargetDebug WheelphoneTargetDebug
How To
- once the application is started you should see "Connected" on top of the window, otherwise you need to restart the application (back button, turn off the robot, turn on the robot, select the app from the list)
- now you can either take the robot in your hands and manually debug target detection or set motors speed and see how perform target detection at various speeds (e.g. max rotation speed in which the marker is still detected)
Actually you can also start the application without being connected to the robot only for tracking debugging purposes.
The following figure show the interface of the application:
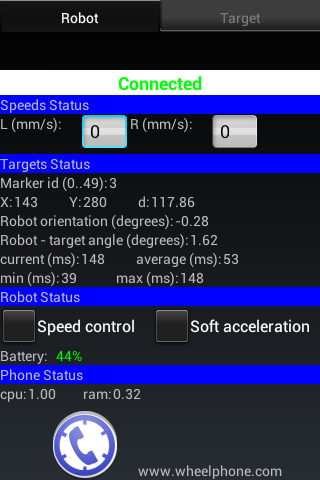
- in the "Speed status" you can set the motors speed (mm/s)
- in the "Target status" you have the current marker id detected (from 0 to 49), the X and Y screen coordinates of the marker center, the distance (scene units) from the marker, the orientation of the robot (degrees) and the angle between the robot and the target (degrees); moreover you receive timing informations about the tracking processing (min, max, current, average in ms)
- in the "Robot status" you can enable/disable speed control and soft acceleration and you have the battery value
- in the "Phone status" you get information about CPU and RAM usage
Wheelphone Follow
Summary
This is a follow the leader application. It allows the robot to follow an object in front of it using the front facing proximity sensors.
Requirements building
- Eclipse: 4.2
- Android SDK API level: 18 (JELLY_BEAN_MR2)
Building process:
- Nothing special: download the code, import to Eclipse and run.
Requirements running
- Android API version: 14 (ICE_CREAM_SANDWICH)
Source
svn checkout https://github.com/gctronic/wheelphone-applications/trunk/android-applications/Wheelphone_follow Wheelphone_follow
How To
Start the application and place something within 5cm in front of the robot. This will make the robot start following the object.
Wheelphone Recorder
Summary
This is a recording application. It makes the robot record while it moves. The purpose of this application is to provide the perspective of the robot while it is moving.
Be aware that this application is not stable, take it as a starting point.
For a workaround on how to record a video directly from the robot refer to section [].
Requirements building
- Eclipse: 4.2
- Android SDK API level: 18 (JELLY_BEAN_MR2)
Requirements running
- Android API version: 14 (ICE_CREAM_SANDWICH)
- Back camera
Building process:
- Nothing special: download the code, import to Eclipse and run.
Source
svn checkout https://github.com/gctronic/wheelphone-applications/trunk/android-applications/Wheelphone_recorder Wheelphone_recorder
How To
Tap on the screen to start and stop the recording/movement. The recorded video is QUALITY_480P (720 x 480 MP4), saved into the sdcard in the following path: /DCIM/wheelphone_capture.mp4.
Wheelphone Faceme
Summary
This is face-tracking application. It keeps track of the position of one face using the front facing camera, then controls the robot to try to face always the tracked face.
Requirements building
- Eclipse: 4.2
- Android SDK API level: 18 (JELLY_BEAN_MR2)
- Android NDK: r9 Android NDK
Building process:
- This application has some JNI code (C/C++), so it is necessary to have the android NDK to compile the C/C++ code. Once you have the NDK, the C/C++ code can be compiled by running (while at the jni folder of the project):
${NDKROOT}/ndk-build –B
Note: Make sure that the NDKROOT environment variable is set to the NDK path
Requirements running
- Android API version: 14 (ICE_CREAM_SANDWICH)
- Front facing camera
Source
svn checkout https://github.com/gctronic/wheelphone-applications/trunk/android-applications/Wheelphone_faceme Wheelphone_faceme
State: Could be extended to allow setting the rotation/acceleration constant, and draw a square on top of the tracked face.
How To
How to interact with the application: start the application and stand where the phone can see your face.
Blob following
Summary
The demo shows the potentiality of having a mobile phone attached to the robot, in this example the phone is responsible of detecting a color blob and to send commands to the robot in order to follow it.
A video of the this demo can be seen here video.
Requirements building
Developer requirements (for building the project):
Requirements running
User requirements (to run the application on the phone):
- the OpenCV package is required to run the application on the phone; on Google Play you can find OpenCV Manager that let you install easily the needed library
APK
The android application can be downloaded from WheelphoneBlobDetection.apk.
Source
The source code is available from the following repository:
svn checkout https://github.com/gctronic/wheelphone-applications/trunk/android-applications/WheelphoneBlobDetection WheelphoneBlobDetection
It's based on the blob-detection example contained in the OpenCV-2.4.2-android-sdk.
How To
Once the application is started you will see that all the values are 0; that's normal, you have to select the blob to follow in order to start the hunting. Select the "Blob tab" and touch on the blob you want to follow; the robot should start moving, otherwise you need to restart the application (back button, turn off the robot, turn on the robot, select the app from the list).
The following figures show the interface of the application:
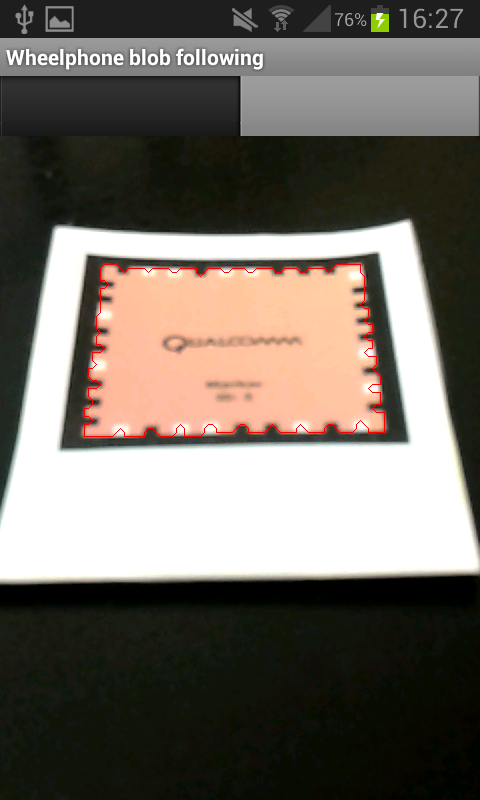
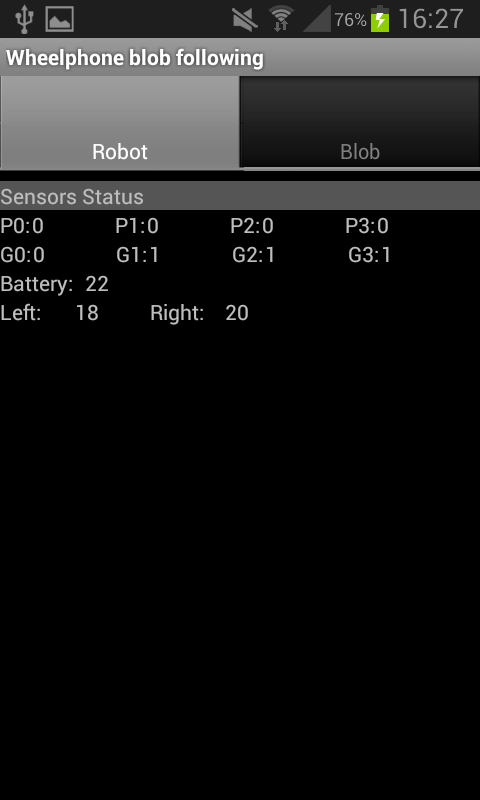
Line following
Summary
This demo shows one of the possible behaviors that can be programmed on the phone, in particular it instructs the robot to follow a line. The threshold and logic (follow a black or a white line) can be choosen from the application.
APK
The android application can be downloaded from WheelphoneLineFollowing.apk.
Source
The source code is available from the following repository:
svn checkout https://github.com/gctronic/wheelphone-applications/trunk/android-applications/WheelphoneLineFollowing WheelphoneLineFollowing
How To
- once the application is started you should see "Connected" on top of the window, otherwise you need to restart the application (back button, turn off the robot, turn on the robot, select the app from the list)
- the robot start moving immediately, thus take it in your hands for doing some settings
- set the base speed of the robot in the bottom of the window, section "Settings"
- set the threshold of the black line you want to follow, basically when the ground value is smaller than the threshold it means that a line is detected; use the ground sensors values reported in the "Ground sensors" section to help you choose the best value
- place the robot on the ground and press the button "Calibrate sensors", remove all object near the robot before doing that; this is needed to be sure that the front proximity sensors are well calibrated since the onboard obstacle avoidance is also enabled by default
- put the robot near a black line and check that it can follow it
The following figure shows the interface of the application:

Webots
Webots allows you to simulate the Wheelphone robot and program different behaviors for the robot in simulation before transferring them onto the real robot. You can download the Wheelphone simulation files from wheelphone.zip (which includes several demo programs) as well as the corresponding student report.
Bootloader
The robot firmware can be easily updated through this app when a new version is available. Refer to the getting started guide for more information on how to update your robot.
The project is based on the example Web Bootloader Demo - OpenAccessory Framework contained in the Microchip Libraries for Applications.
Newest firmware
This bootloader version has to be used to update the robot to the last developed firmware with all new features and bugs corrected. Pay attention that this version breaks compatibility with old applications, section Apps shortcut list shows the list of compatible applications that depend on the Wheelphone library.
APK
The android application can be downloaded directly from WheelphoneBootloader.apk (firmware rev 3.0).
Source
The source code is available from the following repository:
svn checkout https://github.com/gctronic/wheelphone-applications/trunk/android-applications/WheelphoneBootloader WheelphoneBootloader
Older firmwares
This bootloader has to be used to return to the old firmware that is compatible with the applications developed before the Wheelphone Library release.
The android application can be downloaded from wheelphone-bootloader.apk (firmware rev 2.0).
The source code of the application can be download from wheelphone-bootloader.zip (Eclipse project)
Hardware revision 0.1
This bootloader has to be used for robots numbered from 10 to 15; the firmware that will be uploaded to the robot is the same as described in section Newest firmware.
The android application can be downloaded from wheelphone-bootloader.apk (firmware rev 2.0).
The source code of the application can be download from wheelphone-bootloader.zip (Eclipse project)
Calibration
Since the motors can be slightly different a calibration can improve the behavior of the robot in terms of speed.
An autonomous calibration process is implemented onboard: basically a calibration is performed for both the right and left wheels in three modes that are forward with speed control enabled, forward with speed control disabled and backward with speed control disabled. In order to let the robot calibrate istelf a white sheet in which a black line is drawed is needed; the robot will measure the time between detection of the line at various speed. The calibration sheet can be downloaded from the following link calibration-sheet.pdf.
A small application was developed to accomplish the calibration that can be downloaded from WheelphoneCalibration.apk; simply follow the directions given.
The source code is available from the following repository:
svn checkout https://github.com/gctronic/wheelphone-applications/trunk/android-applications/WheelphoneCalibration WheelphoneCalibration