e-puck2 radio module development: Difference between revisions
| Line 38: | Line 38: | ||
For running the demo you need a computer acting as the server and at least 3 robots, even if the more robots you have, the better. | For running the demo you need a computer acting as the server and at least 3 robots, even if the more robots you have, the better. | ||
For each e-puck2 robot you need to: | For each e-puck2 robot you need to: | ||
* prgram the main microcontroller with the factory firmware | * prgram the main microcontroller with the [https://www.gctronic.com/doc/index.php?title=e-puck2#Firmware_update factory firmware] | ||
* program the radio module with the | * program the radio module with the firmware [http://projects.gctronic.com/epuck2/esp32_covid_20.05.20_e8dbf14.zip esp32_covid.zip (20.05.20)] | ||
Python 3 is required on the computer side in order to run the server script. | Python 3 is required on the computer side in order to run the server script. | ||
Revision as of 11:58, 5 June 2020
Introduction
Espressif provides the Espressif IoT Development Framework (ESP-IDF for short), that is a framework for developing applications based on the Espressif ESP32 chip. The firmwares developed for the e-puck2 radio module are based on this framework.
The software development framework provided by Espressif is intended for rapidly developing Internet of Things (IoT) applications, with Wi-Fi, Bluetooth, flexible power management and other advanced system features.
Users can develop applications in Windows, Linux and MacOS based on ESP-IDF.
The C programming language is used to develop code for the radio module of the e-puck2 robot and the ESP-IDF includes the FreeRTOS real time operating system.
Development environment
In order to build the firmware you need to install the toolchain, refer to http://esp-idf.readthedocs.io/en/latest/get-started/#setup-toolchain.
Once installed you can issue the command make flash from the directory Projects\ESP32_E-Puck_2 to build the firmware.
For more information have a look at http://esp-idf.readthedocs.io/en/latest/get-started/#build-and-flash.
Debugging
You can debug your code by printing some information on the serial port, then from the PC you can read these information by opening the Serial Monitor port (have a look at the chapter Finding the USB serial ports used to know what ports are availables).
Get the source code
The radio module firmware source code can be downloaded with the command:
git clone --recursive https://github.com/e-puck2/esp-idf.git
WiFi
The radio module wifi firmware source code can be downloaded with the command:
git clone -b wifi --recursive https://github.com/e-puck2/esp-idf.git
Example projects
COVID-19
We implemented some basic concepts of local infection transmission and proximity tracing exploiting Bluetooth 4 on our robot e-puck2. The goal is to provide an open source framework and to visualize the positive effect of proximity tracing APP within a pandemic such as COVID-19. Such a simulation and demonstration can be extended by the community and we do not pretend that this initial effort is scientifically valid. However already with the initial parameters it becomes clear that self-quarantine triggered by a proximity tracing APP is beneficial.
We implemented a simplified version of the DP-3T protocol (no actual code used from this repo).The following image shows a general overview of the architecture:
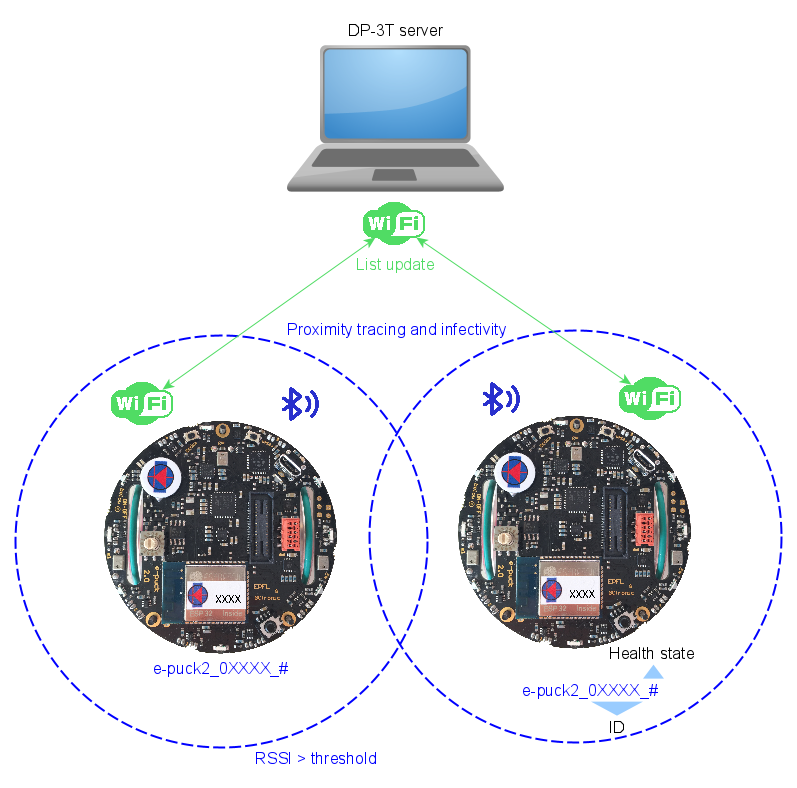
We use Bluetooth for both proximity tracing, as in reality, and infectivity, that is encoded in the advertisement packet together with the robot ID. The proximity of a robot is detected using the BLE signal strength. A computer is designed for acting as the DP-3T server, listening for incoming WiFi connections (TCP) from the robots and maintaining the list of infected robots. No privacy handling is involved.
Here is a list of interesting features exploited from the robot capabilities:
- simultaneous BLE scanning and advertising
- BLE and WiFi cohexistence
- proximity detection through BLE signal strength (RSSI)
Preparation
For running the demo you need a computer acting as the server and at least 3 robots, even if the more robots you have, the better. For each e-puck2 robot you need to:
- prgram the main microcontroller with the factory firmware
- program the radio module with the firmware esp32_covid.zip (20.05.20)
Python 3 is required on the computer side in order to run the server script.
Usage
There are 3 roles available for the simulation:
- patient zero: this is the robot that will start the infection spread by starting being contagious
- DP-3T actor
- no DP-3T actor